6 Creative and Spooky DIY Halloween Costumes for Kids (Built for Real Trick-or-Treating)
Store bought Halloween costumes often cost forty dollars or more. They tear easily, feel cheap, and rely on hot plastic masks that block your child’s vision.
You can build better theatrical illusions at home using cardboard, an old school backpack, and simple thrift store clothes. These projects create memorable, spooky effects without straining your child’s neck or violating school rules.
Every idea below balances visual surprise with real sidewalk comfort.
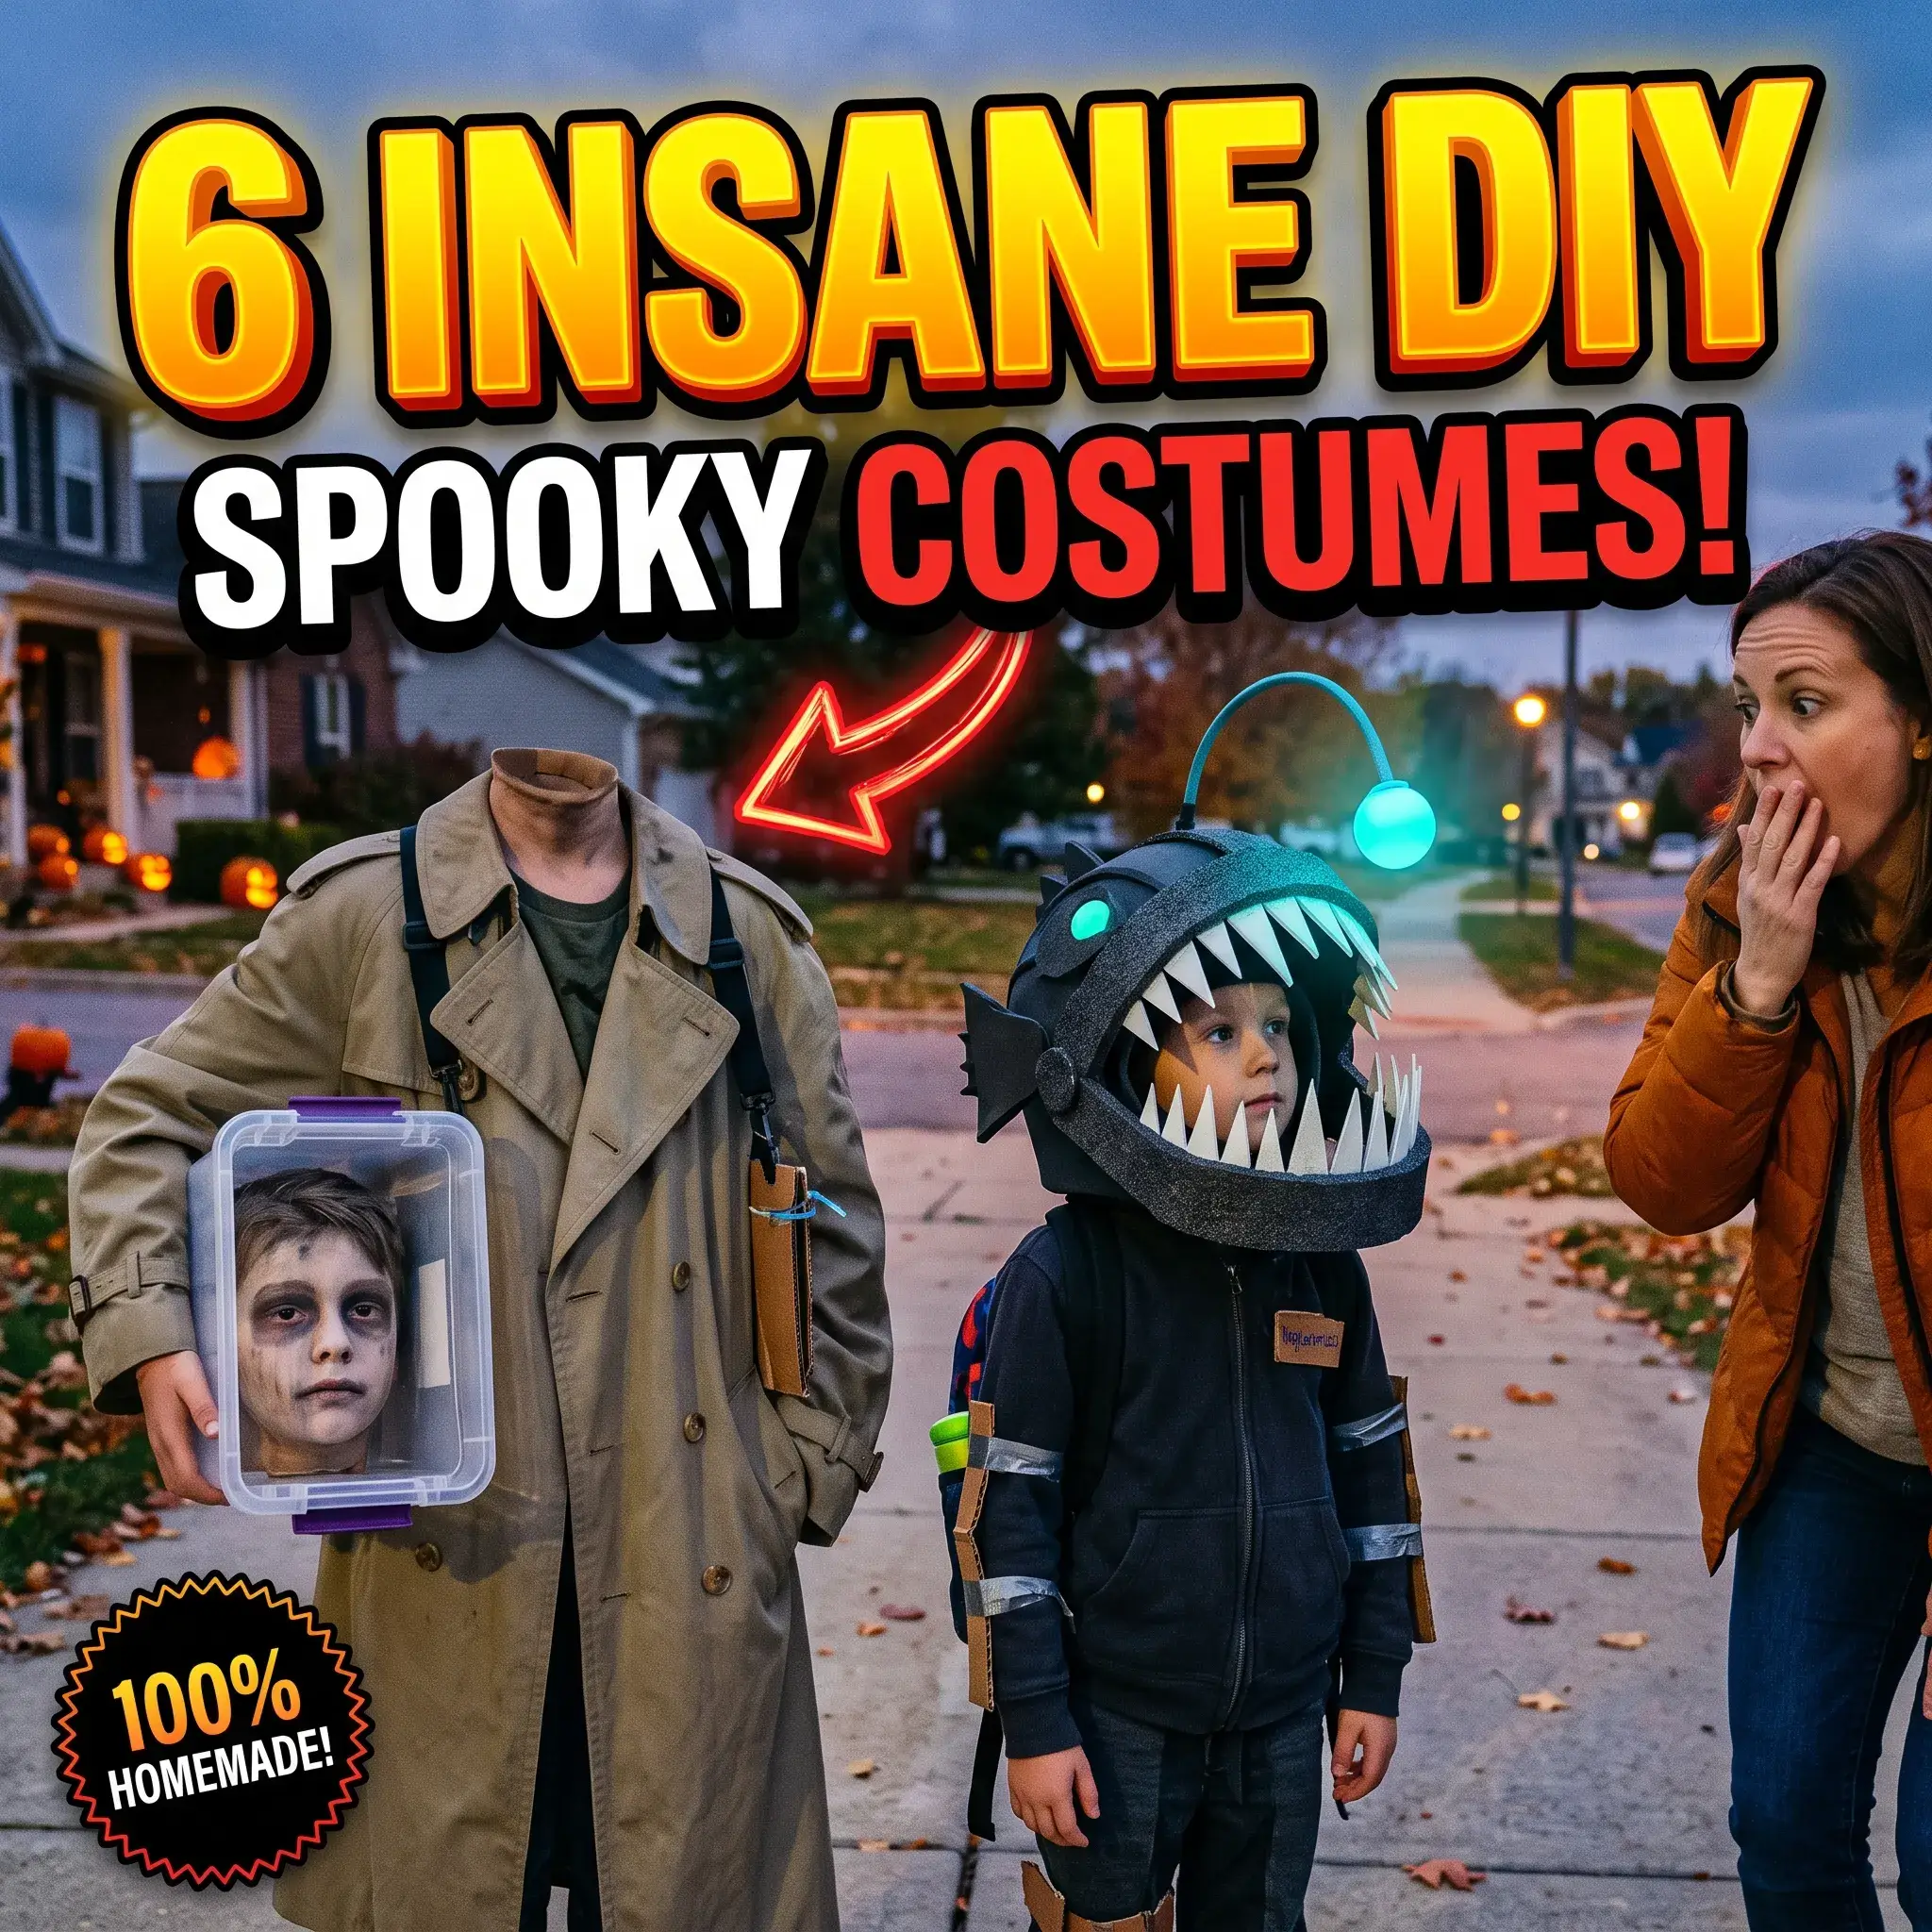
1. The Head-in-a-Jar Laboratory Specimen
- Build Time: 3.5 Hours
- Average Cost: $12 to $18
- Weight: 3.9 lbs (1.8 kg)
- Best Age Group: 8 to 12 Years
- Mobility Rating: High (Legs and peripheral vision remain completely free)
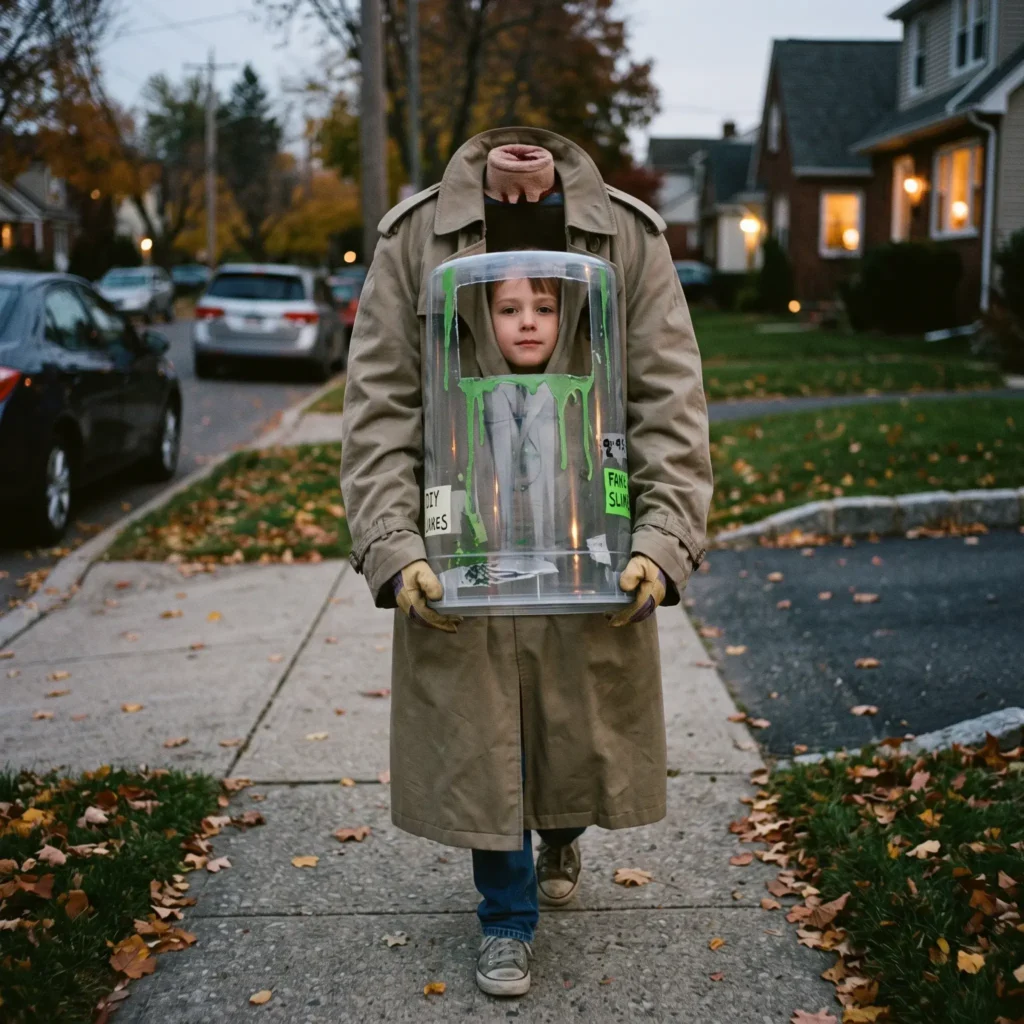
This costume uses an elevated backpack frame to create a classic optical illusion. Your child looks like they are carrying their own severed head inside a giant glass jar.
How the Build Works
An old backpack holds an upright frame made from half-inch PVC pipe or rolled heavy cardboard. This frame rises twelve inches above your child’s natural shoulders. A wire coat hanger attached to the top creates broad, artificial shoulders.
An adult trench coat or lab jacket drapes over the elevated frame. Your child slips their head out through the chest buttons.
The specimen jar comes from a clear plastic pretzel or snack tub. Cut away the entire back wall and circular bottom of the tub. This cutout prevents fog from breath moisture, ensures continuous airflow, and lets your child duck out instantly if they lose balance. Line the cut plastic edges with split foam pipe insulation or duct tape.
Stuff the coat sleeves with crumpled grocery bags. Glue or fasten the cuffs to the sides of the jar so the fake body appears to carry the container.
- Materials and Products Needed:
- Standard child backpack with chest strap
- 3 feet of half-inch PVC pipe or rigid cardboard shipping tube
- 1 adult wire clothes hanger
- 4 heavy-duty nylon zip ties
- 1 clear 8 to 10-quart plastic bulk pretzel or snack container
- 1 adult thrift store trench coat or white lab coat
- Lightweight plastic grocery bags for sleeve stuffing
- 3 feet of split foam pipe insulation for edge padding
- Water-based cosmetic face paint in pale gray and green
2. The Abyssal Bioluminescent Anglerfish
- Build Time: 4 Hours
- Average Cost: $15 to $20
- Weight: 2.4 lbs (1.1 kg)
- Best Age Group: 6 to 9 Years
- Mobility Rating: Excellent (Dark base layer hides the body while mouth sits overhead)
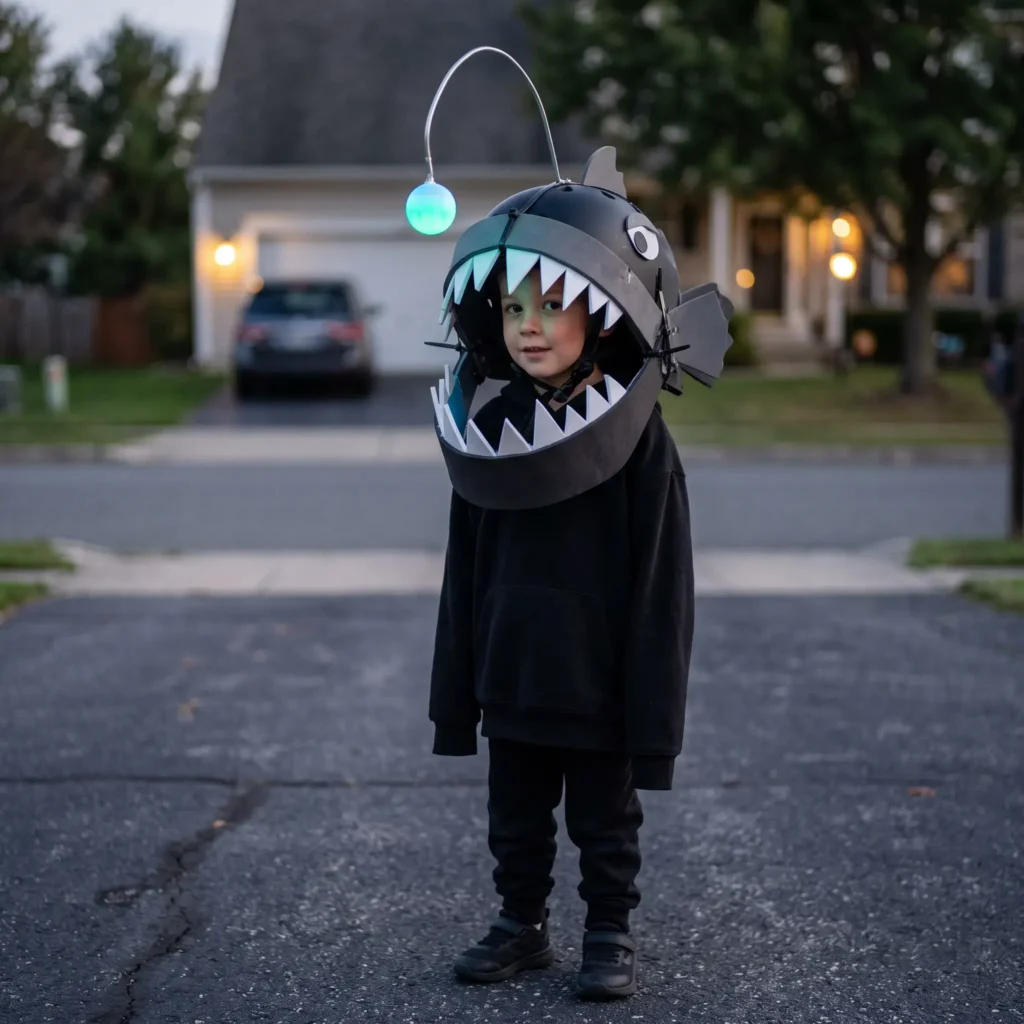
Deep ocean creatures produce natural horror. This design hides your child’s body in the dark, directing attention to a tooth-filled jaw and glowing lure.
How the Build Works
A snug bicycle or skate helmet serves as the foundation. The helmet distributes weight evenly across the head and stays stable in windy weather.
Cut the upper jaw from black high-density craft foam (EVA foam) or shipping boxes. Fasten the jaw through the helmet air vents using zip ties. Suspend the lower jaw on side pivot pins near the child’s jawline so it rests safely above their eye level. Cut sharp, jagged teeth from thin white craft foam sheets.
Bend a sixteen-inch piece of vinyl-coated craft wire upward from the helmet crest to form the lure. Cut a cross-slit in a white ping-pong ball, insert a bright blue-green battery LED, and glue it to the wire tip. Run the thin wire down the back of the helmet into a pocket-sized battery pack.
- Materials and Products Needed:
- Fitted youth bicycle or skateboard helmet
- 2 sheets of 6mm black EVA craft foam
- 1 sheet of 2mm white EVA craft foam for teeth
- 16 inches of 12-gauge vinyl-coated armature wire
- 1 matte white 40mm ping-pong ball
- 1 ultra-bright 5mm blue-green LED with coin battery switch pack
- 1 pack of 8-inch black nylon zip ties
- Plain black hoodie and sweatpants
Check out more Halloween Decor Ideas
3. The Living Haunted Baroque Oil Portrait
- Build Time: 2.5 Hours
- Average Cost: $10 to $14
- Weight: 1.8 lbs (0.8 kg)
- Best Age Group: 6 to 10 Years
- Mobility Rating: High (Shoulder harness supports weight, hands remain completely free)
This living painting looks like a cursed antique portrait where the subject stepped forward into real life. It delivers spooky drama without restricting arm movement.
How the Build Works
Start with a 24 by 36-inch sheet of black foam board. Cut out a central opening measuring 14 by 20 inches for your child’s face and chest.
Glue decorative polystyrene foam moldings around the outer border. Spray the frame with antique gold paint, then wipe it with diluted black acrylic paint to simulate aged metal.
Attach a two-point nylon webbing harness to the back of the frame. The straps cross behind your child’s back, transferring the weight to their shoulders and ribcage.
Dress your child in an old thrift store velvet jacket or vintage lace collar. Glue the outer edges of the jacket lapels directly to the inner frame border. When your child steps into the harness, their head and chest blend directly into the frame.

- Materials and Products Needed:
- 1 sheet of 24×36 inch black foam board
- 8 feet of lightweight decorative polystyrene molding
- Low-temperature craft glue gun with glue sticks
- Antique gold spray paint and black acrylic craft wash
- 4 feet of 1.5-inch flat nylon webbing for shoulder straps
- Thrift store velvet jacket, dark blazer, or lace collar
- Cosmetic white face powder and matte gray makeup
4. The Winged Point Pleasant Mothman
- Build Time: 3 Hours
- Average Cost: $14 to $18
- Weight: 2.8 lbs (1.3 kg)
- Best Age Group: 8 to 12 Years
- Mobility Rating: Medium-High (Wings fold flat against the body for narrow walkways)
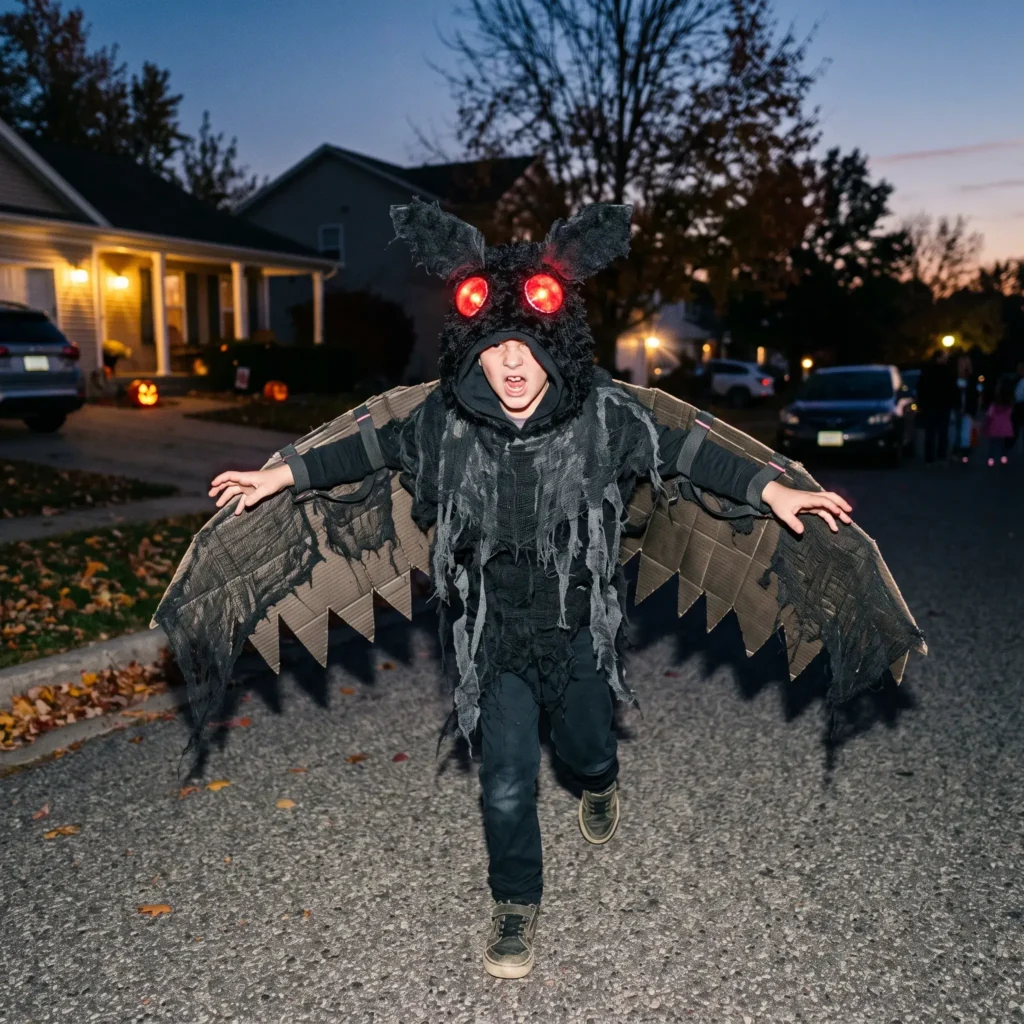
This folklore monster creates a huge silhouette without heavy wood or wire parts. The wings flare open when your child lifts their arms and fold away for easy walking.
How the Build Works
Cut two wing panels from thick corrugated shipping boxes or dense foam sheets. Score vertical fold lines along the outer third of each wing panel.
Attach wide elastic bands to the inner wing tips to fit around your child’s forearms. When your child raises their arms, the wings spread six feet wide. When they lower their arms, the wings fold flat against their sides. This allows easy movement through narrow doors and crowded sidewalks.
Mount two high-output red LEDs on the forehead of a black hooded sweatshirt. Place red plastic lens caps or halved red ping-pong balls over the lights. The red eyes glow brightly in the dark.
Mounting the lights high on the hood ensures drivers see your child without blinding the child’s forward sight.
- Materials and Products Needed:
- 2 large sheets of corrugated shipping box cardboard
- Heavy black zip-up hoodie
- 1 yard of 1.5-inch wide black elastic banding
- 2 red battery-powered LED clip lights or individual pre-wired 5V LEDs
- 1 white ping-pong ball cut in half and colored with red marker
- 2 yards of black cotton cheesecloth for wing texture
- Utility knife with fresh blades
- Matte black spray paint
5. The Glitch Shadow Phantom
- Build Time: 2 Hours
- Average Cost: $12 to $16
- Weight: 1.5 lbs (0.7 kg)
- Best Age Group: 5 to 10 Years
- Mobility Rating: Maximum (Unrestricted running, zero vision blockage)
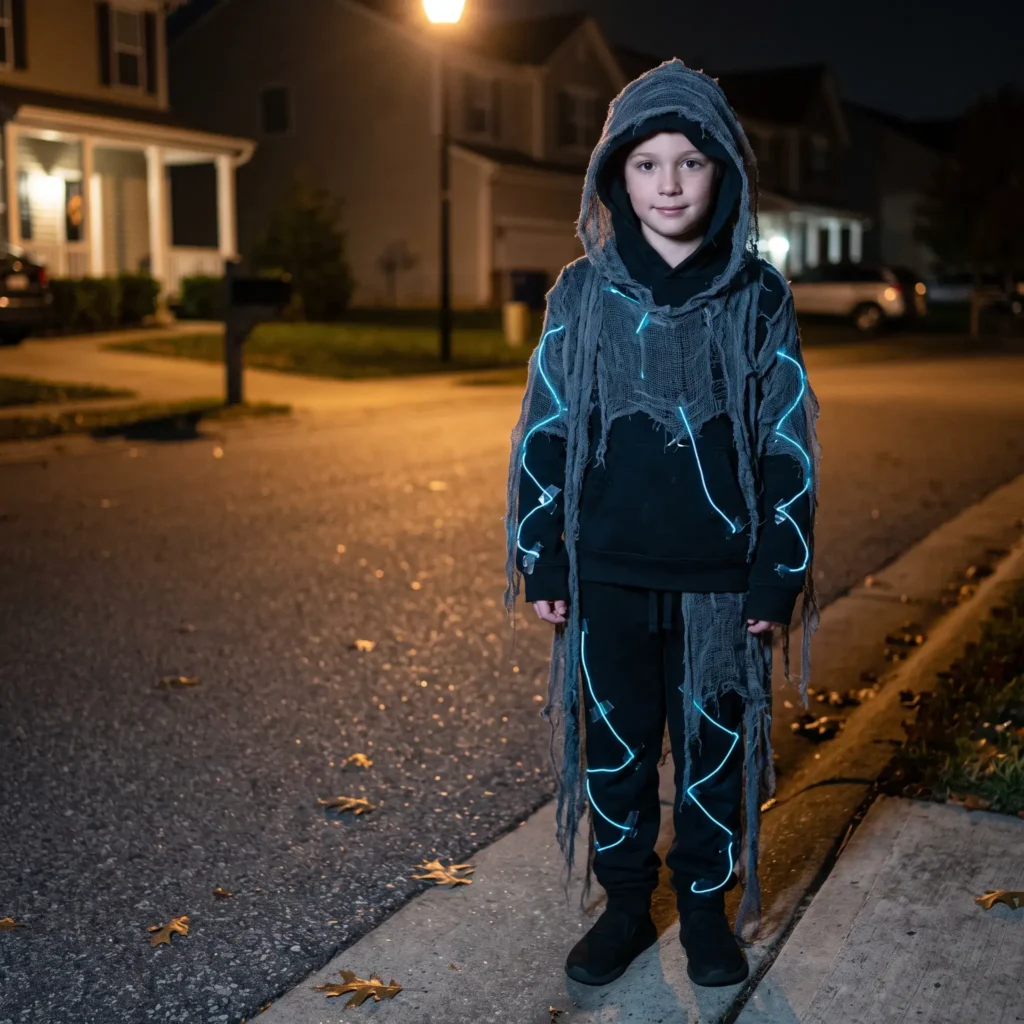
Most shadow costumes use full-face morph suits that make walking dangerous at night. This version skips the head covering entirely and uses glowing lines to create a twitching outline.
How the Build Works
Use an all-black hooded sweat suit as the base layer. Soak two yards of cotton cheesecloth in a bucket with black fabric dye. Tear the dried cloth into rough strips and pin them across the chest, arms, and legs.
Take a nine-foot length of battery-powered neon-blue electroluminescent wire (EL wire). Pin the wire along the outer seams of the pants and up the chest in jagged lines.
Place the compact battery pack inside the hoodie front pocket. When your child steps into the dark, the ragged cloth blends into the night. The glowing wire outlines a spooky, glitchy silhouette that drivers can spot from far away.
- Materials and Products Needed:
- Plain black zip hoodie and matching sweatpants
- 9 feet (3 meters) of battery-powered aqua or blue EL wire with inverter
- 2 AA batteries
- 2 yards of unbleached cotton cheesecloth
- 1 bottle of black liquid fabric dye
- 1 box of small black safety pins
- Black sneakers
6. The Spider Cocoon Egg Sac Swarm
- Build Time: 1.5 Hours
- Average Cost: $8 to $12
- Weight: 1.2 lbs (0.5 kg)
- Best Age Group: 4 to 8 Years
- Mobility Rating: High (Loose joint wraps preserve natural knee and elbow bending)
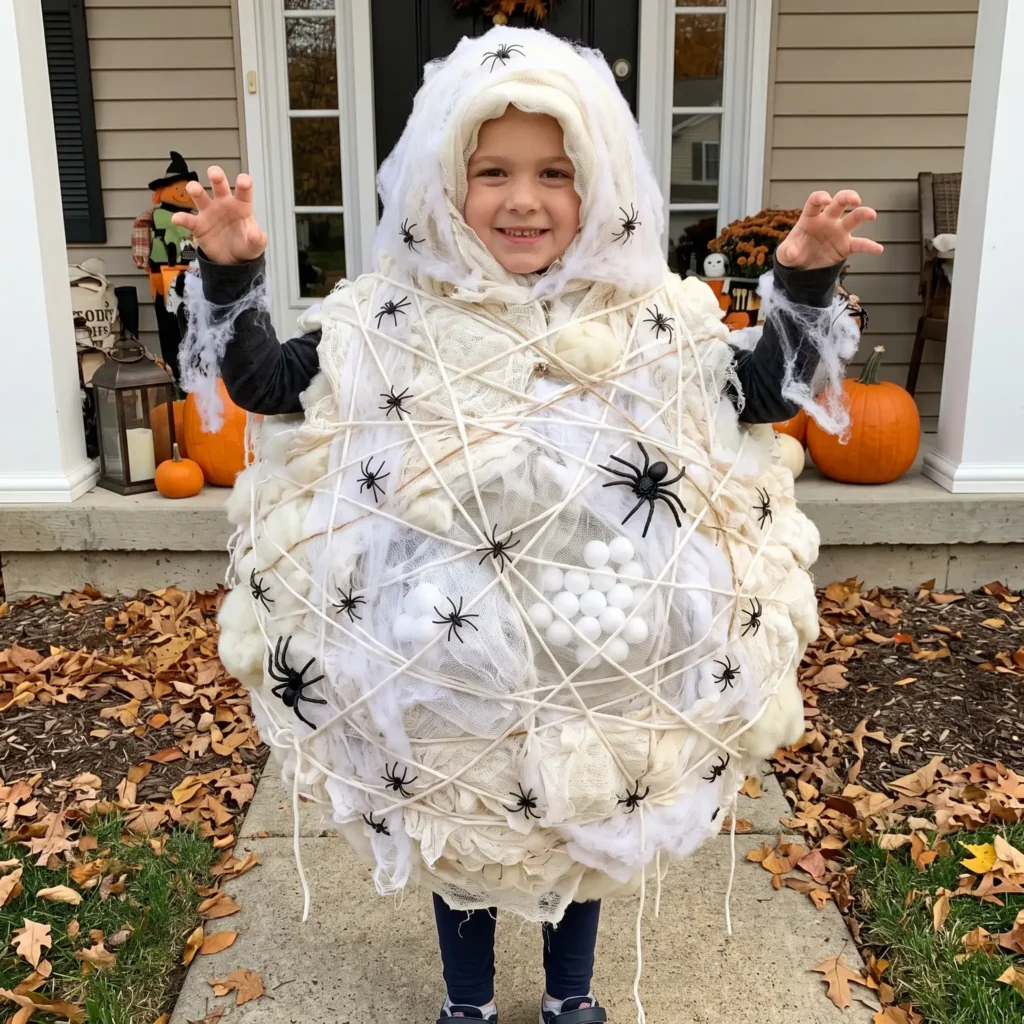
This build looks like an authentic movie prop, yet it takes under ninety minutes to assemble. Your child appears trapped inside a spider web with glowing eggs.
How the Build Works
Dress your child in gray or beige thermal underwear. Stretch white synthetic cobweb batting until it turns thin and wispy. Wrap the webbing around the torso and limbs, securing anchor points with fabric glue or small safety pins. Leave knees and elbows loose so your child can walk easily.
Group eight ping-pong balls together on the shoulder or chest using low-temperature hot glue. Insert a five-foot strand of battery-powered micro fairy lights inside the balls through small slits in their bases.
Glue plastic spiders across the egg cluster and down the sleeves. The internal light makes the eggs glow softly without shining into your child’s eyes.
- Materials and Products Needed:
- Light gray or beige thermal long underwear set
- 1 bag of synthetic stretch spider web batting
- 8 white plastic table tennis balls
- 1 string of warm-white battery LED micro fairy lights
- 1 bag of small plastic spiders
- Low-temperature craft glue gun
- 10 small safety pins
Pediatric Sizing and Structural Weight Limits
Children tire much faster than adults. Carrying too much weight above their shoulders causes neck fatigue, poor balance, and early meltdowns on the sidewalk.
Keep your builds within these weight and frame guidelines:
| Child Age Bracket | Maximum Rig Weight | Main Physical Limitation | Recommended Frame Style |
|---|---|---|---|
| 3 to 5 Years | 2.5 lbs (1.2 kg) | Developing balance, zero head loads | Back-mounted soft wings, torso tabards |
| 6 to 8 Years | 5.5 lbs (2.5 kg) | High activity, tripping risks | Front-counterbalanced harnesses, light helmet mounts |
| 9 to 12 Years | 10.0 lbs (4.5 kg) | Can support vertical spars, needs quick exit | Backpack frames, mechanical wing spans |
Practical Safety Rules for Homemade Costumes
Real trick-or-treating brings real hazards like dark street curbs, moving cars, and open porch candles. Use these simple safety precautions for every build.
1. Fire-Safe Cardboard and Fabrics
Untreated cardboard, loose gauze, and synthetic wigs ignite easily near porch pumpkins. The Consumer Product Safety Commission sets strict flammability standards for youth apparel (16 CFR Part 1610).
Before painting cardboard or hanging paper props, treat them with this simple homemade fire-retardant wash:
- Mix 100 grams of household borax and 75 grams of boric acid into 1 quart of warm water.
- Brush the solution evenly over raw cardboard, paper tubes, or open cheesecloth.
- Let the surfaces dry completely before adding primer or paint. This salt layer slows flame spread if the costume touches a candle.
2. Vision Clearance Over Masks
Data from the American Academy of Pediatrics confirms that full-face plastic masks cause frequent falls. Masks trap warm breath, fog up quickly, and block side vision.
Skip masks completely. Use water-based cosmetic face paints instead. Test a dime-sized dab of paint on your child’s inner forearm 24 hours before Halloween to check for red spots or skin irritation.
3. Emergency Breakaway Straps
Any harness resting on your child’s body must release instantly if snagged. Use Velcro patches or plastic snap buckles on chest straps. If a wing or frame catches on a bush or porch railing, the harness snaps open immediately without pulling on your child’s neck.
Keep costume hemlines at least three inches above the shoes to prevent falls on curbs and porch steps.
Safe Special Effects: Cold Fog and Glowing Chemistry
You do not need toxic chemicals or expensive machines to create theatrical stage effects.
Backpack Cold-Mist Fogger
Real fog machines get scalding hot, while dry ice can freeze skin on contact.
A safe substitute uses a 5-volt ultrasonic mist disc, the same part found in desktop humidifiers.
- Fill a small plastic water bottle halfway with tap water.
- Float the small ultrasonic disc on top of the water.
- Plug the USB cable into a cellphone power bank inside your child’s backpack.
- Run flexible silicone aquarium tubing from the bottle cap out through your child’s collar or prop edges.
The disc atomizes room-temperature water into thick white fog. The vapor stays completely cool and safe against skin and clothing.
Non-Toxic Glowing Chemistry
Do not crack open chemical glow sticks to paint clothes. The fluid inside can burn skin and eyes.
Use these safe household liquids that glow under pocket blacklights (365 to 395 nm UV-A):
- Icy Blue: Brush regular tonic water onto light fabric. The quinine in the drink absorbs ultraviolet light and glows bright cyan.
- Bright Slime Green: Crush one vitamin B2 tablet (riboflavin) into warm water. This mixture produces an intense neon-yellow glow that is safe for skin.
- Vivid White: Paint liquid laundry detergent directly onto dark cotton. The whitening agents dry clear in daylight but light up bright white under blacklight beams.
Frequently Asked Questions
How do I make a costume spooky without getting it banned at school?
Focus on optical tricks, scale, and lighting rather than blood and weapons. Most schools ban full-face masks, fake blood, and toy weapons. Costumes like the Living Portrait, the Head-in-a-Jar, or the Bioluminescent Anglerfish create big reactions through clever construction while keeping your child’s face visible and hands completely free.
How do I keep my child warm without hiding their costume?
Build the costume one size larger than your child’s normal clothing. Measure their body while they wear their actual winter jacket or warm fleece sweater. For walking costumes, use thermal base layers as the foundation and attach parts directly over the warm layers.
Can my child use the bathroom without taking the whole costume apart?
Test your build before Halloween night. Keep lower pants and shoes completely separate from upper frames. Any backpack or chest frame should unclip from the shoulders within five seconds using quick-release buckles.
Pick one structural base to begin: an old daypack, an outgrown bike helmet, or a pair of warm thermals. Keep the total frame weight light, protect your child’s walking vision, and test the straps on the sidewalk before Halloween night arrives.