7 Kitchen Coffee Bar Ideas That Make the Space Work Harder
Counter space is the most valuable surface in your kitchen. A standard espresso machine, burr grinder, knock box, and bean canisters easily claim four feet of preparation space. When you add rising steam that ruins upper cabinets, your morning brew causes daily frustration.
Making your coffee station work harder does not mean adding decorative trays or hanging signs. It means treating your coffee station as an engineered workspace. You can tuck equipment away when you finish brewing. You can run dedicated water lines to stop manual refills. Most importantly, you can design the space to handle multiple jobs from morning to night.
Here are seven practical coffee bar layouts that reclaim counter space and improve your daily routine.
7 Smart Coffee Bar Layouts That Maximize Space
1. The Pocket-Door Breakfast Larder
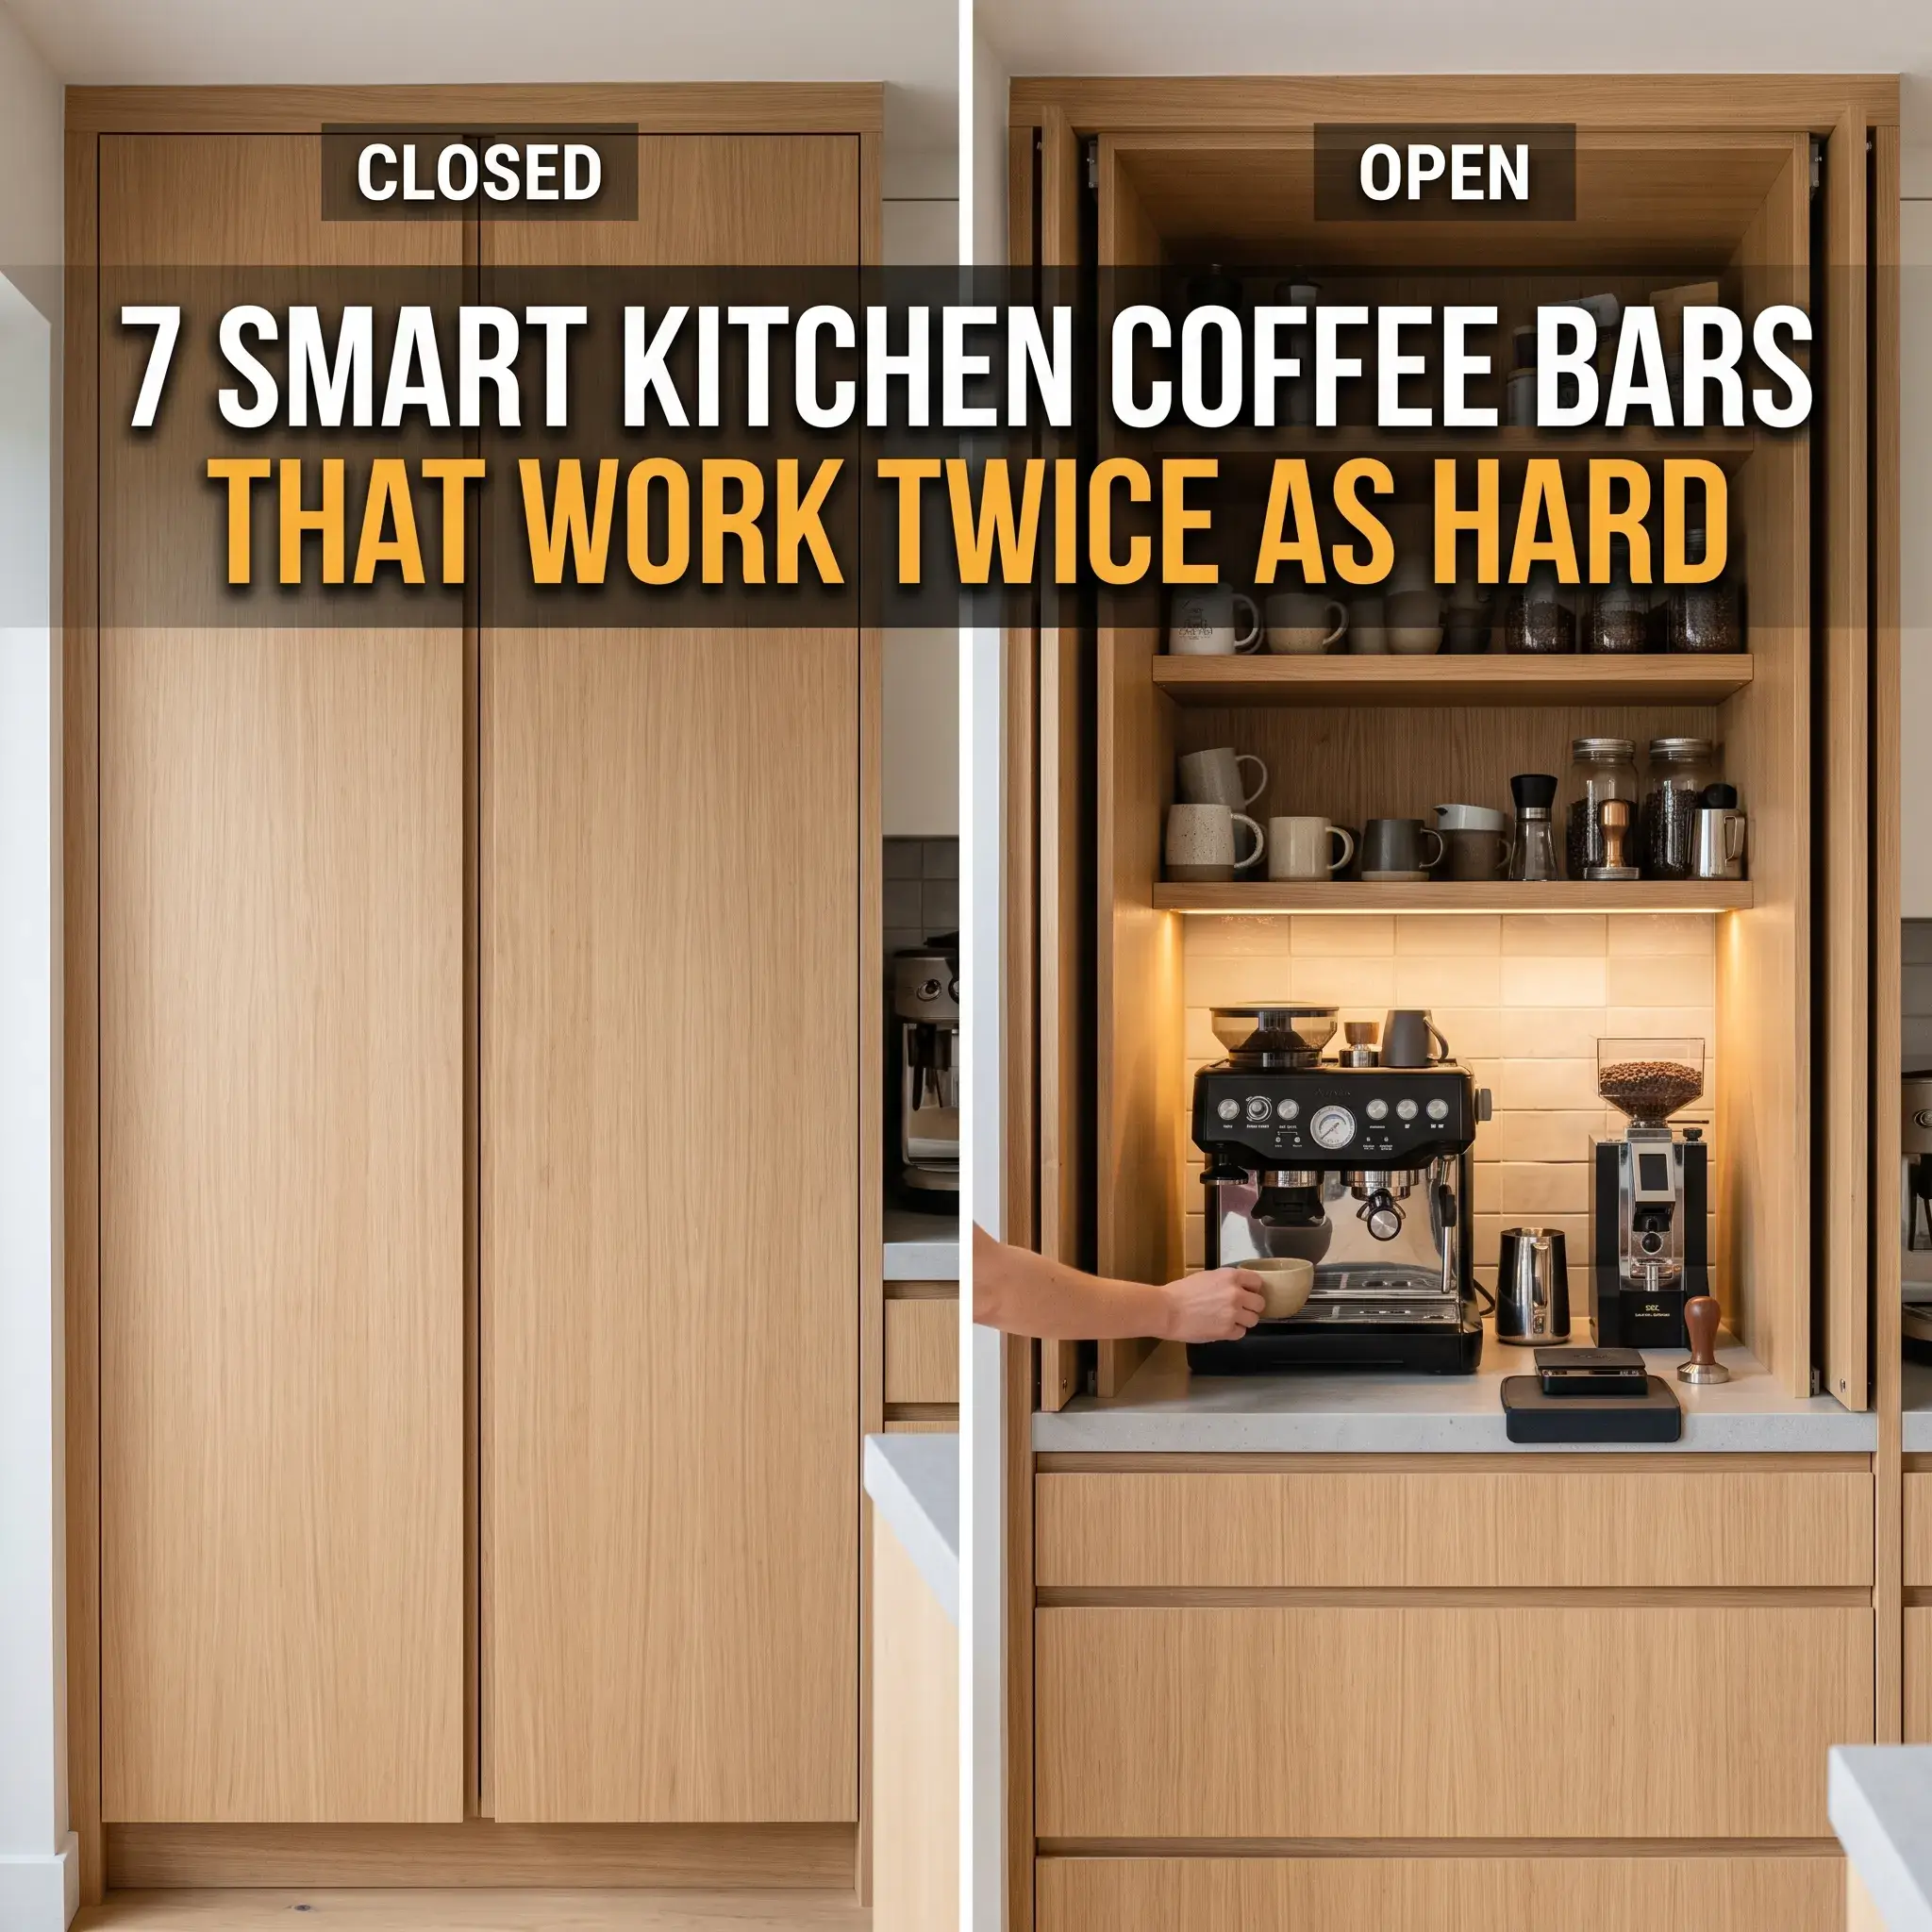
Standard cabinet doors swing out into your walkway. In a busy morning kitchen, open doors block traffic between the refrigerator and the sink. A pocket-door breakfast larder fixes this problem through specialized sliding hardware. The doors open ninety degrees and slide smoothly into hidden side pockets inside the cabinet body.
When the doors slide away, you gain full access to your coffee machine, toaster, cups, and syrups. When you finish brewing, you slide the doors shut. The entire station disappears behind flush cabinetry, instantly clearing visual clutter from the room.
Inside the cabinet, mount a shallow shelf six inches above the counter for daily cups. Add a dedicated electrical outlet with an automatic safety shutoff switch. This switch cuts power to the outlets whenever the doors close, protecting your home from heat buildup.
- Image File Name: pocket-door-kitchen-coffee-bar-larder.jpg
- Image Alt Text: White oak pocket door cabinet open to reveal a built in coffee station with espresso machine and warm LED lighting.
- Products and Hardware Used:
- Hawa Concepta III pocket door slide system
- Docking Drawer safety interlock outlet with thermal cutoff
- Solid white oak interior shelving with integrated 2700K LED channel strips
- Breville Dual Boiler espresso machine
- Baratza Sette 270 coffee grinder
2. The Flush Undercounter Tap Station
Placing a bulky espresso machine on a central island blocks open sightlines. It builds a visual wall right through your living area.
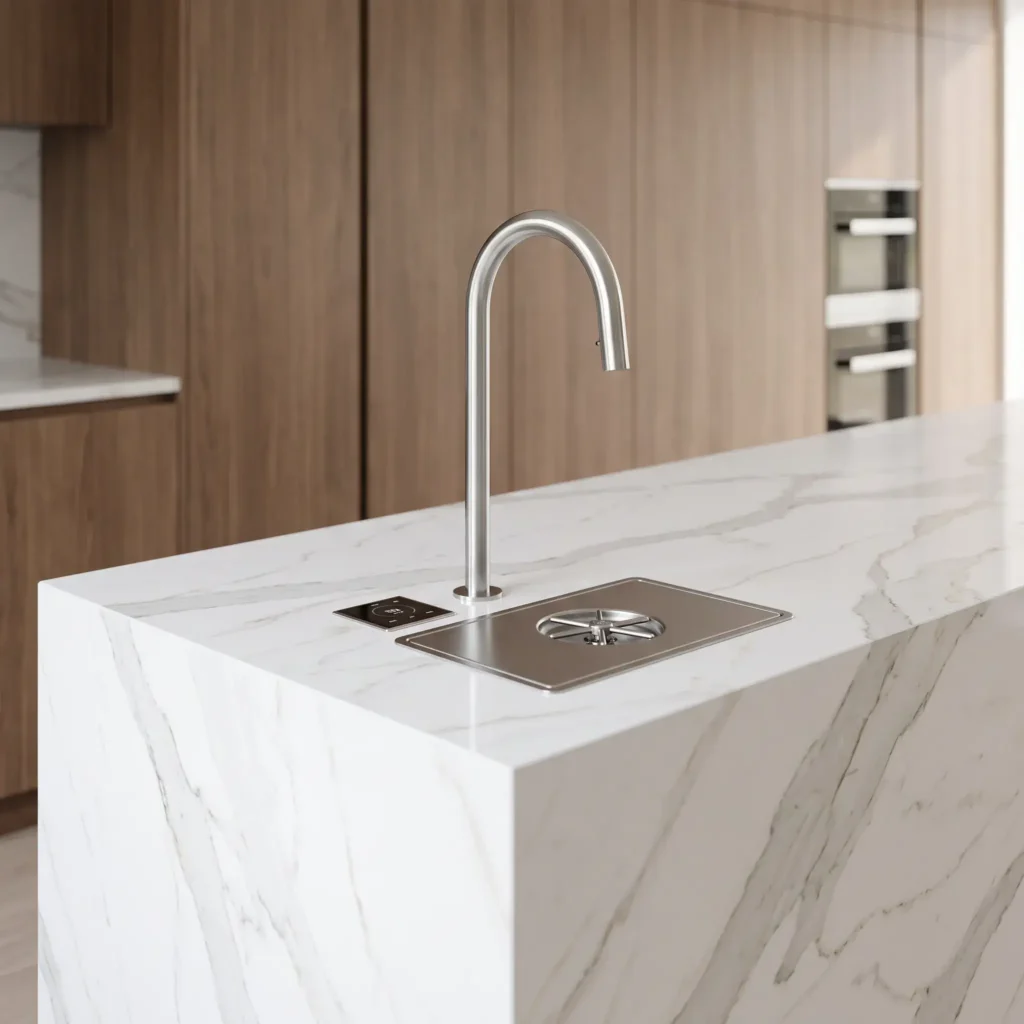
An undercounter tap system moves the mechanical parts below the counter. The main boiler, water pumps, and milk lines sit securely inside the island base cabinet. Only a slim stainless steel dispensing neck and a flush drip tray sit on your countertop.
This setup reclaims nearly five square feet of usable island surface. You can prepare food on the island, and then dispense hot water, espresso, or micro-foamed milk with a touch of a button. The counter stays wide open for entertaining or family meals.
- Products and Hardware Used:
- Modbar Espresso AV undercounter system or Scanomat TopBrewer
- Flush-mount stainless steel drip tray with drain connection
- Integrated undercounter milk refrigerator drawer
- 3/8-inch braided stainless steel water line with shutoff valve
Check out more Modern Kitchen Ideas
3. The Slide-Out Appliance Glider Station
Steam damages kitchen cabinetry. When you brew espresso or drip coffee under standard wall cabinets, steam rises straight into the finish. Heat and moisture warp the wood joints and peel cabinet veneer over time.
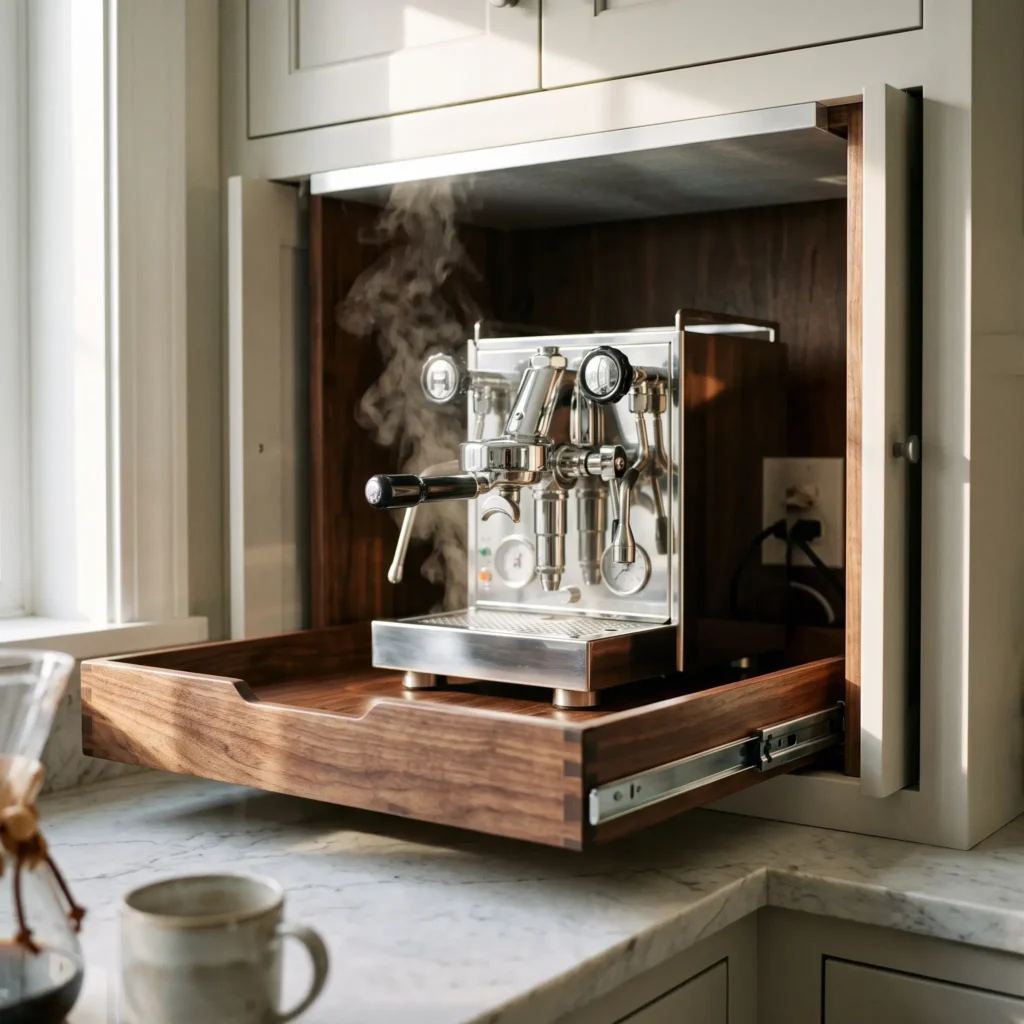
A heavy-duty slide-out tray fixes this issue without a major renovation. Install industrial full-extension drawer slides directly onto your existing countertop or inside a low appliance garage. Set your coffee brewer and grinder on the platform.
Pull the tray forward twelve inches before brewing. Steam vents safely into the open room instead of hitting your cabinets. The forward position also lets you pour water and coffee beans into top-loading hoppers with ease. Push the tray back when you finish.
- Products and Hardware Used:
- Accuride 100-pound full-extension ball bearing slides with lock-out detents
- Custom sealed walnut pull-out tray with rubber perimeter bumper
- Silicone tamping mat
- Peel-and-stick aluminum steam deflector shield for cabinet undersides
4. The 24-Inch Nook with Vertical Storage
Many kitchens have an awkward corner or short wall run that sits empty. A space as narrow as twenty-four inches can become a complete beverage hub if you build vertically.
Keep the counter surface clear by mounting tools on the wall. Install a magnetic stainless steel rail to hold your portafilters, tamping tools, and milk pitchers. Hang open shelves to the ceiling to store mugs, filters, and bean canisters.
Choose a compact single-boiler machine or a precision pour-over dripper. Add an under-shelf stemware rack to hold cups upside down, protecting them from dust. By using the vertical wall plane, a two-foot wide nook works just as hard as a six-foot counter.
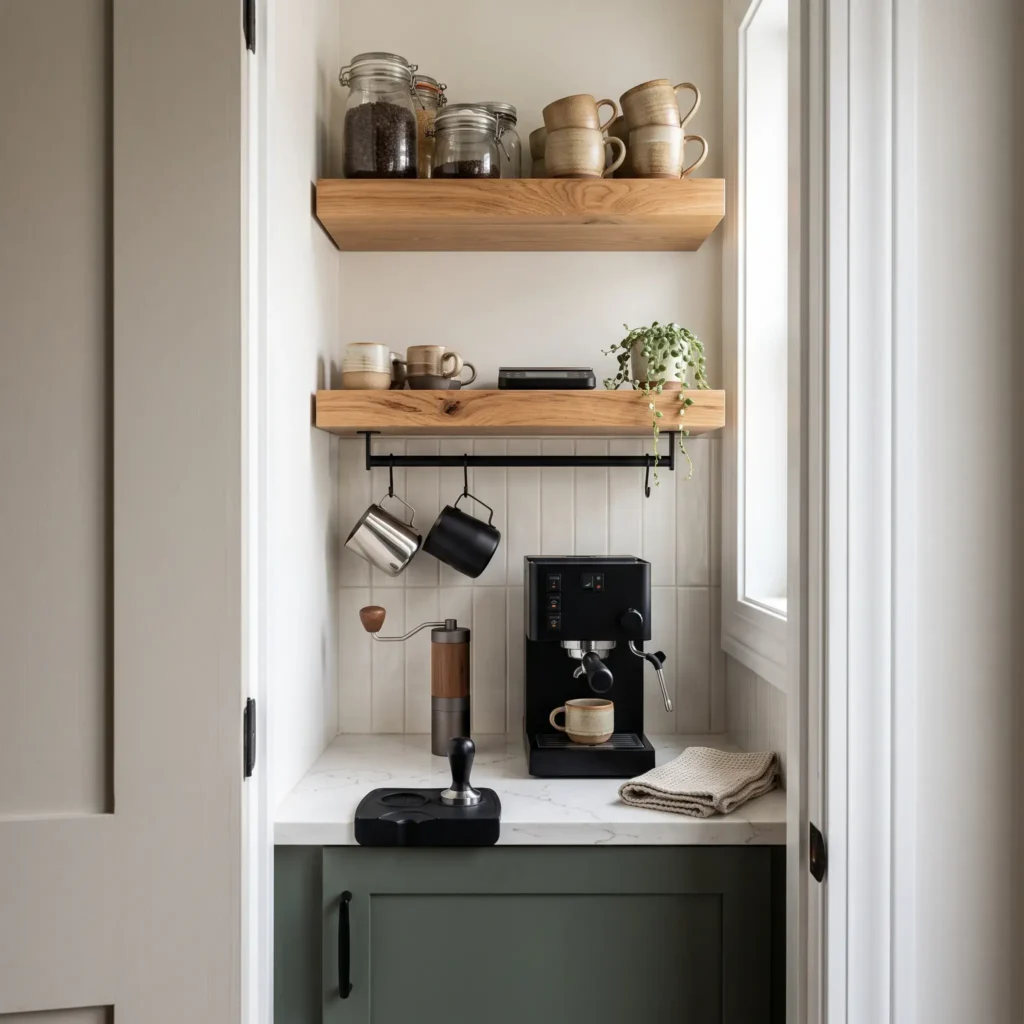
- Products and Hardware Used:
- Wall-mounted magnetic tool bar for steel coffee accessories
- Matte black steel floating shelf brackets with white oak planks
- Compact single-boiler espresso machine (such as Gaggia Classic Pro)
- Timemore digital coffee scale with silicone heat pad
5. The Day-to-Night Beverage Hub
A coffee bar that only works between 7:00 AM and 9:00 AM wastes valuable kitchen space. You can double its utility by designing it for morning coffee and evening entertaining.
Place an all-in-one hydrothermal dispenser on the counter. Systems like the Zip HydroTap dispense boiling 212-degree water for morning tea and Americanos. The same tap dispenses chilled still and sparkling water for evening cocktails. This single fixture removes the need for kettles and soda makers.
Under the counter, install a dual-zone beverage refrigerator. Set the top zone to 37 degrees for whole milk and oat milk. Set the bottom zone to 52 degrees for wine and craft beer. Upper glass cabinets hold coffee mugs on lower shelves and cocktail glassware on upper shelves.
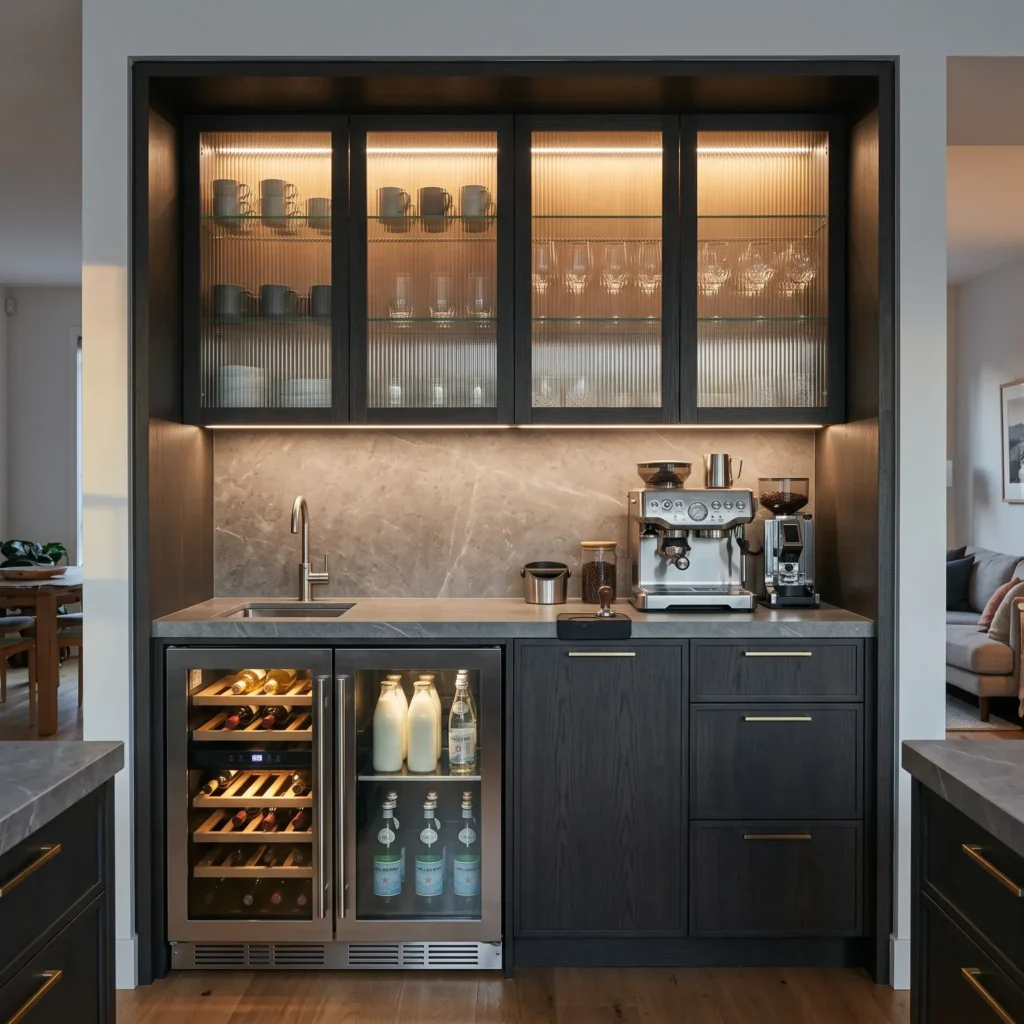
- Products and Hardware Used:
- Zip HydroTap or Quooker Flex hydrothermal dispenser
- Dual-zone undercounter beverage refrigerator
- Reeded glass upper cabinets with interior warm accent puck lights
- Drop-through stainless steel waste chute with compost bin below
6. The Autonomous Mobile Barista Cart
If your kitchen lacks counter space and you cannot run new plumbing lines, build an autonomous mobile station. A heavy-duty wood or steel cart can live along a dining room wall and roll into the kitchen when needed.
Store a five-gallon potable water bottle inside the lower cart cabinet. Connect an on-demand diaphragm pump, like the Flojet BW5000, to feed pressurized water directly into your espresso machine. Add a small inline accumulator tank to keep water pressure steady and quiet the pump.
Run the drain hose from your drip tray into an empty five-gallon greywater container. This setup gives you a plumbed coffee experience without cutting into your kitchen walls or floors. Heavy-duty locking rubber casters keep the cart completely stable while you lock in the portafilter.
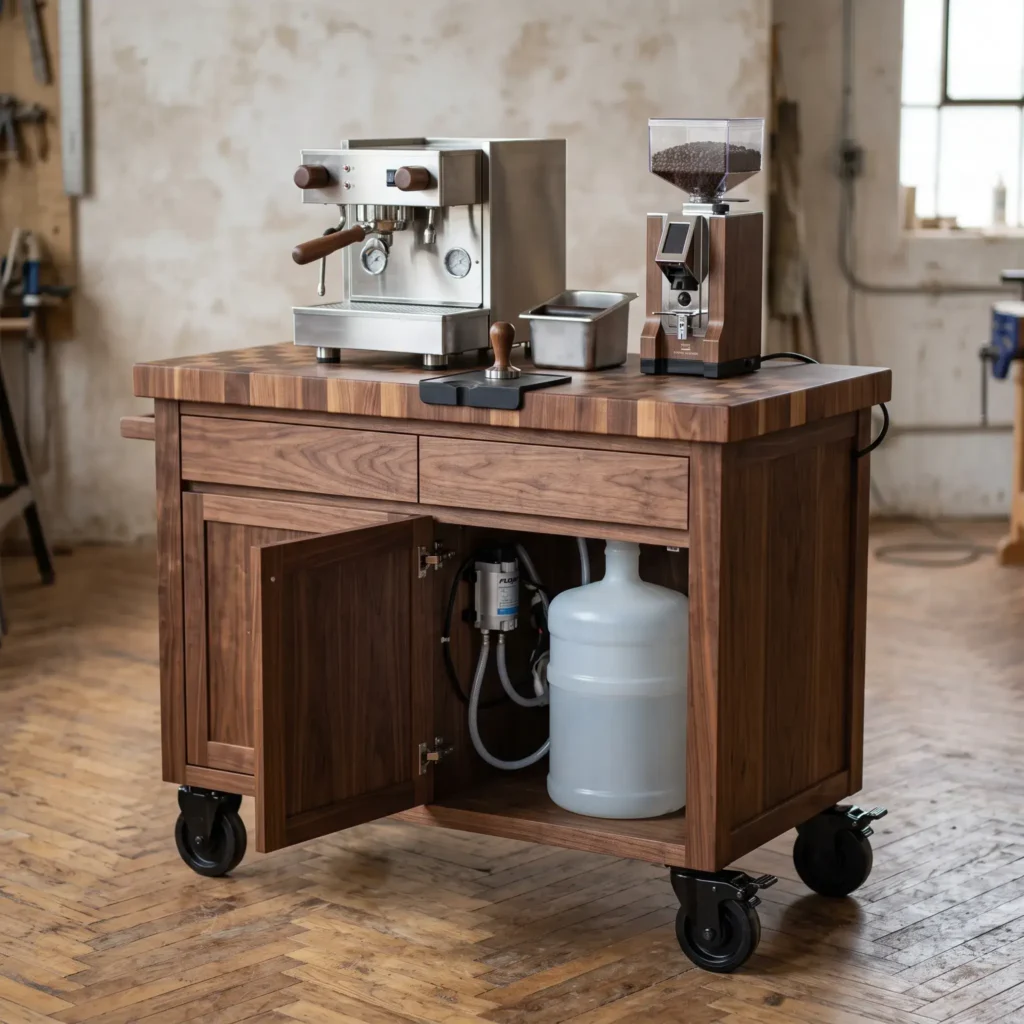
- Products and Hardware Used:
- Flojet BW5000 bottled water dispensing system
- 2-liter inline water pressure accumulator tank
- 3-inch locking polyurethane swivel casters
- Heavy-duty butcher block or stainless steel top cart
7. The Shared Baker and Barista Station
Coffee preparation and baking share several key functional needs. Both require non-porous prep surfaces, quick access to sugar and flour, and easy cleanup for powders and grounds.
Combine these two workstations into a single prep zone. Install a spring-loaded appliance lift in the base cabinet next to your coffee machine. The lift raises a heavy stand mixer flush with the counter when you bake, then tucks it away below.
Use sintered stone for the countertop. Sintered stone handles boiling water and hot portafilters without scorching. It also provides a cool, non-stick surface for rolling dough. Add an in-counter pitcher rinser to quickly wash out milk pitchers, measuring spoons, and mixing bowls.
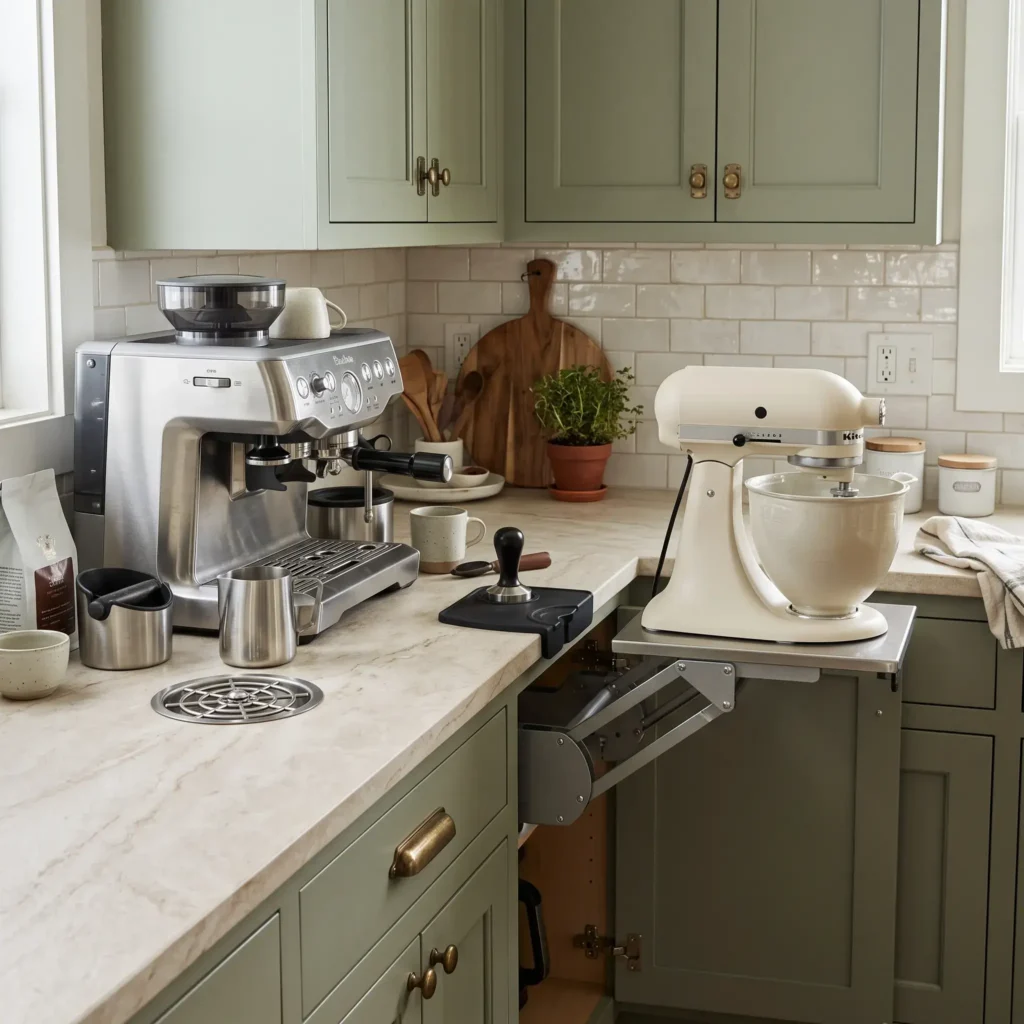
- Products and Hardware Used:
- Rev-A-Shelf heavy-duty spring-assisted appliance lift
- Rhino Coffee Gear in-counter pitcher rinser
- Dekton sintered stone countertop with eased edge profile
- Deep base drawers with custom wooden organizers for baking tools and coffee filters
Engineering the Barista Workflow
A messy coffee station happens when you fight your layout. Moving back and forth across the kitchen to grab beans, dump grounds, and fetch milk creates spills.
Set up your station using a linear left-to-right workflow. If you are left-handed, reverse the layout.
- Zone 1: Store and Weigh (Far Left)Keep whole bean jars and your digital scale here. Dose your portafilter or grinder hopper directly.
- Zone 2: Grind and Tamp (Center Left)Place your burr grinder here. Keep a tamping mat flush against the grinder base to catch loose coffee dust.
- Zone 3: Extract and Steam (Center Right)Position your espresso machine or primary brewer here. Keep milk pitchers on a small riser next to the steam wand.
- Zone 4: Dump and Clean (Far Right)Place your knock box, compost chute, and pitcher rinser here. You clean up in one smooth movement without crossing back over your clean prep space.
This arrangement lets you prepare a drink in one continuous motion without crossing your hands or dripping milk across the counter.
Mechanical, Electrical, and Plumbing Guidelines
Treating a serious coffee setup like a standard kitchen appliance leads to tripped breakers and water leaks. High-performance coffee gear requires proper mechanical support.
Electrical Capacity
A dual-boiler espresso machine draws between 1,400 and 2,000 watts when heating both boilers. An electric kettle draws 1,500 watts. A commercial-style grinder draws around 300 watts.
Running these appliances together on a standard 15-amp kitchen circuit will trip your breaker. Install a dedicated 20-amp, 120-volt circuit with 12 AWG copper wire for your coffee station. This setup provides up to 2,400 watts of peak power, letting you grind beans and brew coffee without power interruptions.
If your station sits inside a cabinet or appliance garage, install a certified safety switch. National electrical codes prohibit heat-producing appliances from operating inside closed cabinets. An interlock switch cuts power to the outlets whenever the cabinet doors close.
Water Line and Filtration
City tap water contains calcium and magnesium. When heated inside a boiler, these minerals turn into solid limescale. Scale coats heating elements and clogs narrow water valves, causing expensive machine repairs.
Do not use pure distilled water or plain reverse osmosis water without remineralization. Water with zero mineral content is acidic and leaches metals from brass and copper boilers.
Install a dedicated reverse osmosis system that includes a remineralization stage. Aim for water with 70 to 150 parts per million total dissolved solids and a neutral pH of 7.0. This balance protects your equipment and brings out sweet, clear flavors in your coffee.
Drainage Requirements
Dumping drip trays by hand leads to spills across the kitchen floor. Plumb your drip tray directly into your household drain.
Use an 18-millimeter (3/4-inch) flexible drain hose. Run the hose with a continuous downward slope of at least 1/4 inch per foot into your sink P-trap. Avoid dips or sags in the hose line. Standing water inside a low hose trap collects coffee oils and creates foul odors.
Choosing the Right Countertop Material
Spilled coffee is acidic, with a pH near 5.0. Steam and hot metal portafilters can damage delicate surfaces. Choosing the right worktop material protects your investment.
| Material | Heat Limit | Stain Resistance | Acid Resistance | Practical Verdict |
|---|---|---|---|---|
| Sintered Stone (Dekton) | Over 750°F | Near zero porosity; immune to stains | Fully inert against citric and coffee acids | Best Choice: You can set hot kettles and portafilters directly on the stone. |
| Engineered Quartz | 300°F maximum | Excellent stain resistance | High resistance to mild acids | Use with Caution: The resin binders scorch easily under hot portafilters. |
| Natural Marble | Over 600°F | Porous; absorbs oils if unsealed | Etches quickly from coffee and citrus acids | Not Recommended: Requires constant sealing and dulls quickly in coffee zones. |
| Solid Butcher Block | 250°F maximum | Requires mineral oil or sealant | Wood fibers stain if acidic liquid sits | Good for Prep Carts: Warm aesthetic, but requires regular oiling and a drip mat. |
Critical Cabinet Clearances and Dimensions
Before installing cabinets or shelves, measure the complete working space your gear needs.
- Counter Depth: Provide a full 24-inch counter depth. Machines need two inches behind them for power cords and water lines. They also need four inches in front for the drip tray and tamping pad.
- Vertical Headroom: Standard upper cabinets hang 18 inches above the counter. Most prosumer grinders stand 14 to 17 inches tall. Always leave a 4-to-6-inch clearance buffer above your equipment. This open space lets you pour beans into the hopper and lift water reservoirs without scraping the cabinetry.
- Side Swing Clearance: Keep at least six inches of open space to the side of your machine. This gives your hands room to swing the portafilter into the grouphead without hitting a cabinet wall.
- Rear Ventilation: Leave two inches of open space between the machine backplate and the backsplash wall. This space allows natural convective airflow to vent heat from the internal boilers.
Frequently Asked Questions
How much counter space do I need for a complete coffee station?
A basic drip coffee or capsule setup needs only 18 to 24 inches of counter width. A full espresso setup with a separate grinder, knock box, and tamping area requires 36 to 48 inches of width and a standard 24-inch counter depth.
How do I stop steam from ruining my upper kitchen cabinets?
Mount your coffee maker on a heavy-duty pull-out slide tray. Pull the tray forward before brewing so steam escapes into the room. You can also apply an adhesive aluminum steam shield to the underside of the cabinet directly above the machine.
Is plumbing an espresso machine worth the cost?
Plumbing your machine saves time and protects your equipment. You never have to carry water jugs across the kitchen or empty full drip trays by hand. Plumbed systems also let you add commercial-grade water filters that prevent internal limescale buildup.
Can I install a coffee bar inside a pantry?
Yes, you can build a coffee bar inside a pantry if you follow basic safety steps. You need a dedicated 20-amp electrical outlet and at least 22 inches of vertical clearance for steam dissipation. Install an exhaust fan or keep the pantry doors open during use to prevent moisture buildup.
What is the easiest way to manage coffee grounds and waste?
Install a drop-through knock chute flush with your countertop. Place a trash can or compost bucket directly below the chute inside the lower cabinet. You knock spent coffee pucks through the opening without lifting heavy counter boxes or tracking wet grounds across the floor.
Summary Checklist for Planning Your Coffee Station
Before buying equipment or hiring a carpenter, review this checklist:
- [ ] Measure your tallest appliance with the hopper lid open.
- [ ] Confirm your upper cabinets provide at least four inches of overhead clearance.
- [ ] Check your electrical panel to ensure you have a dedicated 20-amp circuit.
- [ ] Test your tap water hardness and choose a remineralizing filtration system.
- [ ] Select pocket door hardware if you want to conceal the station along a main walkway.
- [ ] Choose a non-porous countertop material like sintered stone that resists heat and acid stains.
- [ ] Lay out your tools in a linear order from bean storage to the cleanup sink.
Planning these details early ensures your coffee bar stays organized, protects your kitchen cabinetry, and gives you a durable workstation for years to come.