8 Non-Tacky DIY Easter Decorations That Actually Look High-End

Most store-bought holiday decor makes a room look cluttered. Bright plastic grass, foam eggs, and artificial pastel flowers clash with neutral walls and clean furniture. You do not need neon novelties to welcome spring into your living space.
You can bring the season indoors using living roots, bare branches, natural stone, and plant-based dyes. These eight projects draw inspiration from European traditions and organic modern design. Each project brings warmth, texture, and natural life into your space without looking like a school craft.
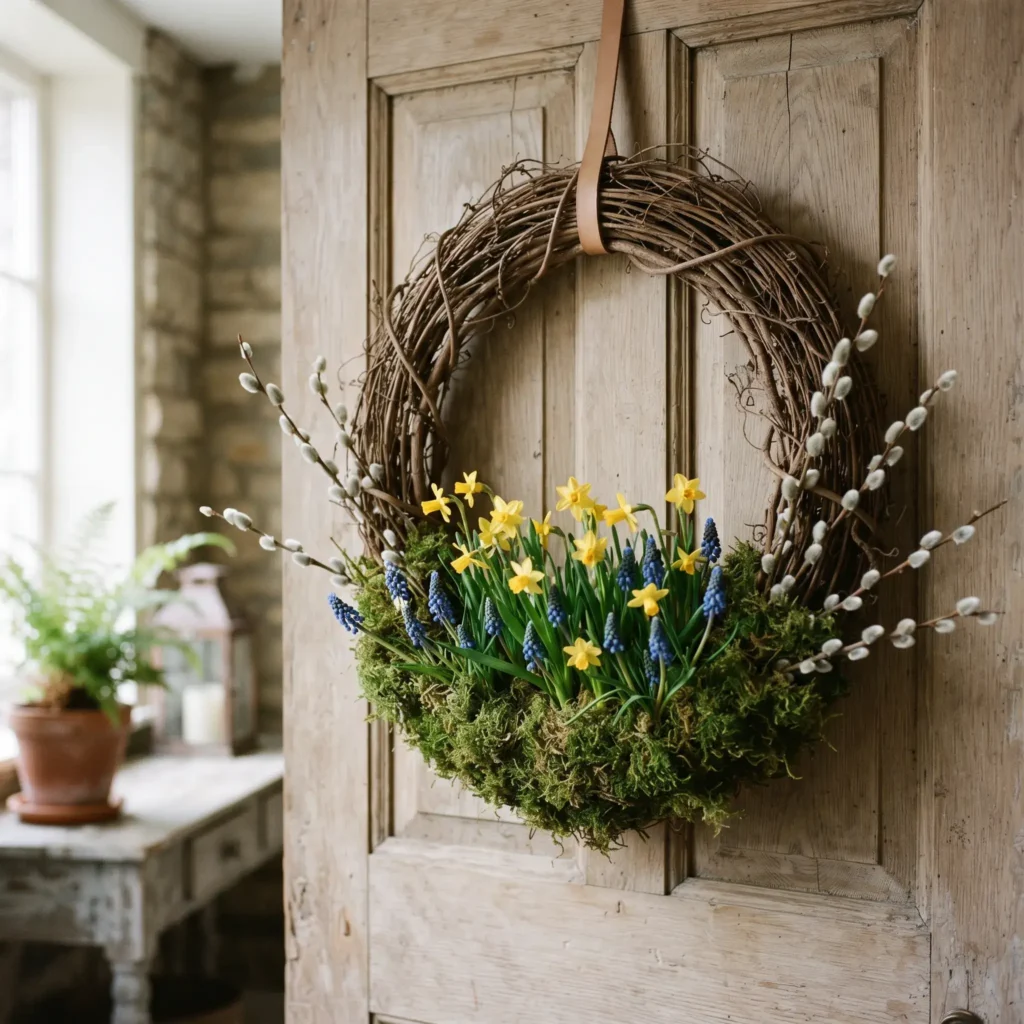
1. The Living Spring Bulb and Grapevine Wreath
Traditional front door wreaths use fake silk flowers that fade under the sun and collect dust. This living wreath replaces artificial greenery with real dwarf bulbs and fresh moss. The bulbs sprout, root, and open directly on your door over three to four weeks.
How to Style and Assemble It
- Soak natural sheet moss in room-temperature water for ten minutes. Squeeze out the excess moisture until the moss stays damp without dripping.
- Unpot three dwarf daffodils and four grape hyacinths. Brush loose dirt away from the root balls, keeping the central roots intact.
- Wrap each small cluster of bulbs in damp moss to create self-contained root pockets.
- Secure these moss pockets to the bottom curve of an 18-inch natural grapevine wreath using paper-wrapped wire. Fasten the wire firmly around the roots without pinching the green stems.
- Weave fresh pussy willow stems behind the bulbs, following the natural curve of the wood so the silver buds fan outward.
- Leave the top two-thirds of the grapevine bare. This open negative space keeps the wreath looking light and balanced.
- Mist the moss base daily with a spray bottle. Every five days, take the wreath down and rest its base in an inch of water for ten minutes.
Products Used in This Design
- 18-inch natural wild grapevine wreath form
- 3 potted dwarf daffodils (Narcissus ‘Tête-à-tête’)
- 4 potted grape hyacinths (Muscari armeniacum)
- Fresh preserved sheet moss
- 6 fresh pussy willow stems (18 to 24 inches long)
- 20-gauge paper-covered rustic bind wire
- Continuous fine-mist glass spray bottle
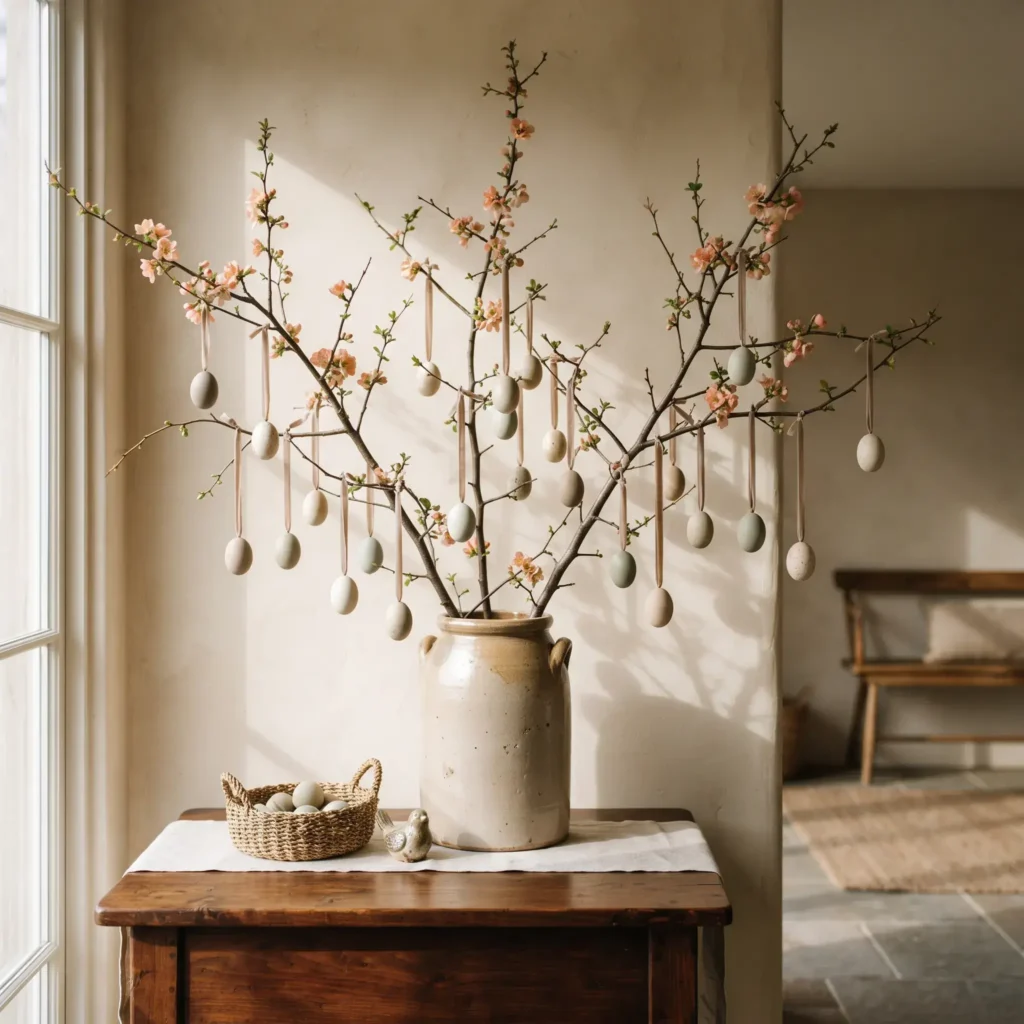
2. The German Ostereierbaum (Architectural Easter Tree)
Central European homes celebrate early spring by forcing cut branches indoors and hanging blown eggs from their nodes. This architectural display adds height and drama to an entryway console table without requiring synthetic tabletop trees.
How to Style and Assemble It
- Choose a heavy antique stoneware crock, ceramic jug, or concrete amphora.
- Pour ten to fifteen pounds of washed pea gravel into the bottom. This heavy base anchors the container and prevents tall branches from tipping over.
- Push three to five long flowering quince or budding birch branches deep into the gravel. Angle the branches outward to mimic the shape of a wild shrub.
- Prepare blown chicken or duck eggs dyed in muted earth tones.
- Cut a thin bamboo skewer into half-inch pieces. Tie a ten-inch length of narrow velvet ribbon tightly around the center of each skewer scrap.
- Slide the wooden toggle through the small hole in the base of the eggshell. Once inside, the wood turns flat against the shell dome, creating a strong hanger without glue.
- Hang the eggs only from thick inner branch joints where the wood is at least a quarter-inch thick. This keeps delicate outer twigs from sagging.
Products Used in This Design
- Heavy salt-glazed antique stoneware crock (10 to 12 inches tall)
- 15 lbs washed pea gravel or tumbled river stone
- 4 architectural flowering quince or budding birch branches (3 to 5 feet tall)
- Blown, hollow chicken or duck eggshells
- 1/8-inch double-faced silk velvet ribbon in taupe and hazelnut
- Thin bamboo skewers
- Natural plant dye extracts (onion skins and black tea)
Check out more Easter Decor Ideas
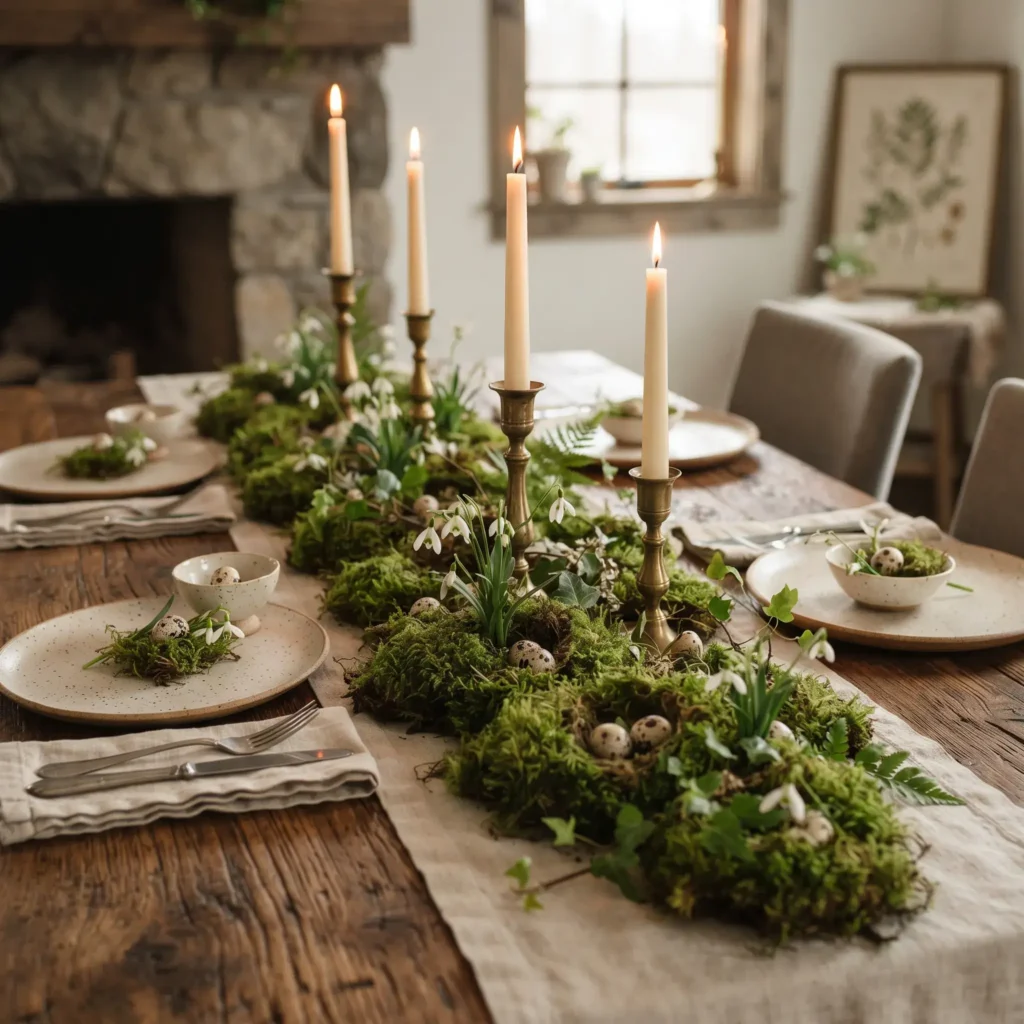
3. Nordic Botanical Moss Meadow Table Runner
Tall dining centerpieces get in the way of conversation across the table. This low-profile moss runner creates an unbroken forest floor down the middle of your dining table, keeping sightlines open while showing off living greenery.
How to Style and Assemble It
- Lay a clear 1.5-mm silicone protective liner down the center spine of your dining table. This non-porous layer protects fine wood from moisture damage.
- Place an unpressed, raw-edge oatmeal linen runner directly over the silicone base.
- Set small, shallow terracotta saucers at uneven intervals along the runner.
- Unpot small sprouted bulbs, like miniature paperwhites or snowdrops, and place them directly into the saucers with a bit of damp soil.
- Tear fresh cushion moss and preserved sheet moss into uneven pieces. Pack the moss over and around the saucers until all container rims disappear under rolling green mounds.
- Set solid brass candleholders of varying heights directly into open gaps between the moss patches.
- Scatter small clusters of blown, speckled quail eggs into the low moss dips.
- Light pure ivory beeswax tapers right before dinner for a warm amber glow.
Products Used in This Design
- Raw-edge oatmeal flax linen runner
- Clear 1.5-mm silicone table protector strip
- 4 shallow unglazed terracotta saucers (3-inch diameter)
- Fresh live cushion moss (Leucobryum glaucum) and sheet moss
- 4 pots of sprouting dwarf snowdrops or paperwhite bulbs
- Blown natural speckled quail eggs
- Solid unlacquered brass candleholders (staggered 4-inch, 6-inch, and 8-inch heights)
- Hand-dipped ivory pure beeswax taper candles
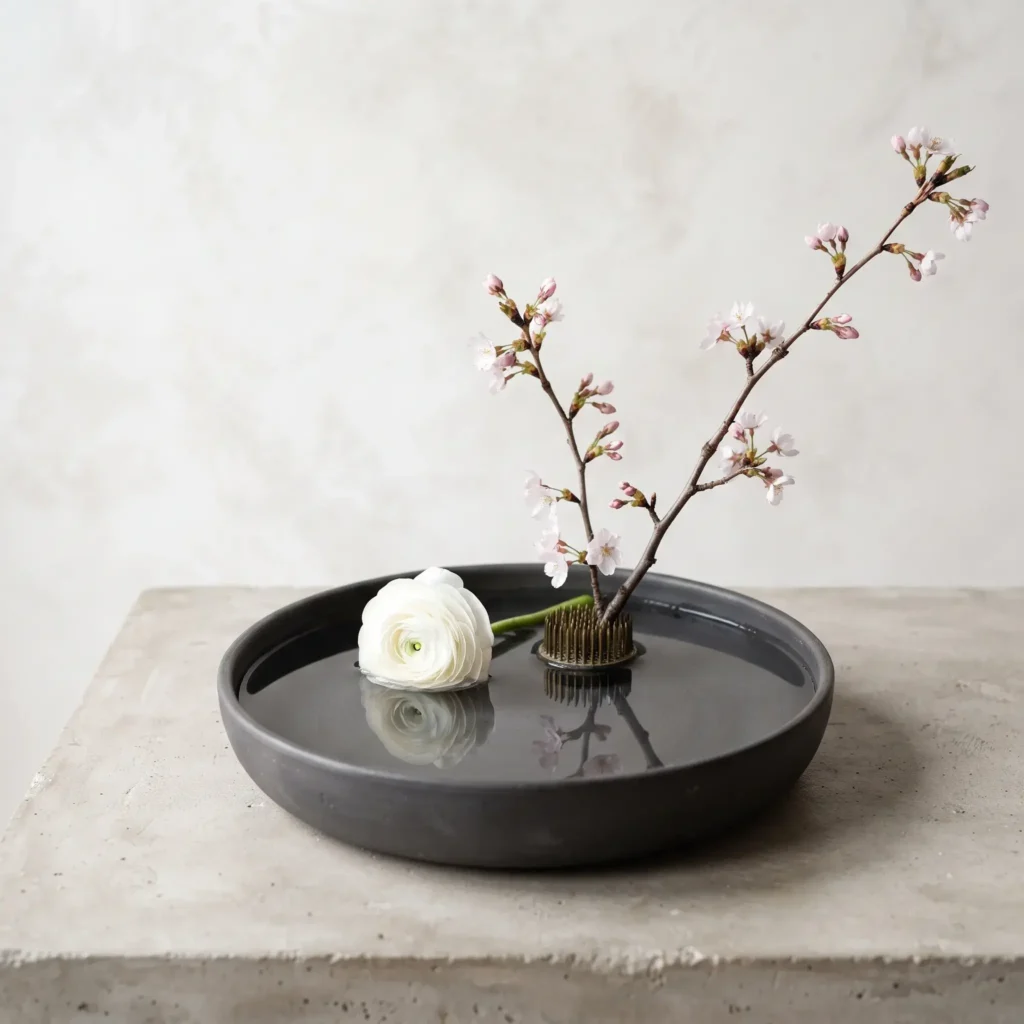
4. Minimalist Kenzan Ikebana Bowl
Green floral foam sheds microplastics and breaks down into synthetic dust. This clean arrangement uses a traditional brass pin frog (kenzan) to anchor a few sculptural branches and fresh flowers in open water.
How to Style and Assemble It
- Use a shallow, heavy ceramic bowl or low-rim stoneware dish, eight to ten inches wide.
- Press three pea-sized beads of floral fixing putty onto the dry rubber base of a heavy 70-mm brass pin frog.
- Press the brass frog firmly into the bottom of the dish, positioning it slightly off-center for an asymmetrical look.
- Pour fresh room-temperature water into the dish until the needles sit half an inch under the surface.
- Trim your main flowering branch to twice the width of the bowl. Cut its base at a sharp angle and press it straight down onto the brass pins, tilting it slightly backward.
- Insert a shorter secondary branch at two-thirds the height of the first stem, extending it sideways over the rim.
- Cut a single pale flower, like a white French tulip or Japanese ranunculus, so its stem sits low near the water. Push it firmly onto the front pins to anchor the visual weight.
- Change the water every two days to keep the surface clear and the stems fresh.
Products Used in This Design
- Low-rim matte ceramic compote bowl (8 to 10 inches wide)
- 70-mm heavy brass floral pin frog (kenzan) with rubber gasket
- Waterproof floral fixing putty
- Japanese floral shears (Hanabasami)
- 2 sculptural flowering cherry or dogwood branches
- 1 to 2 fresh stems of white Japanese ranunculus or pale French tulips
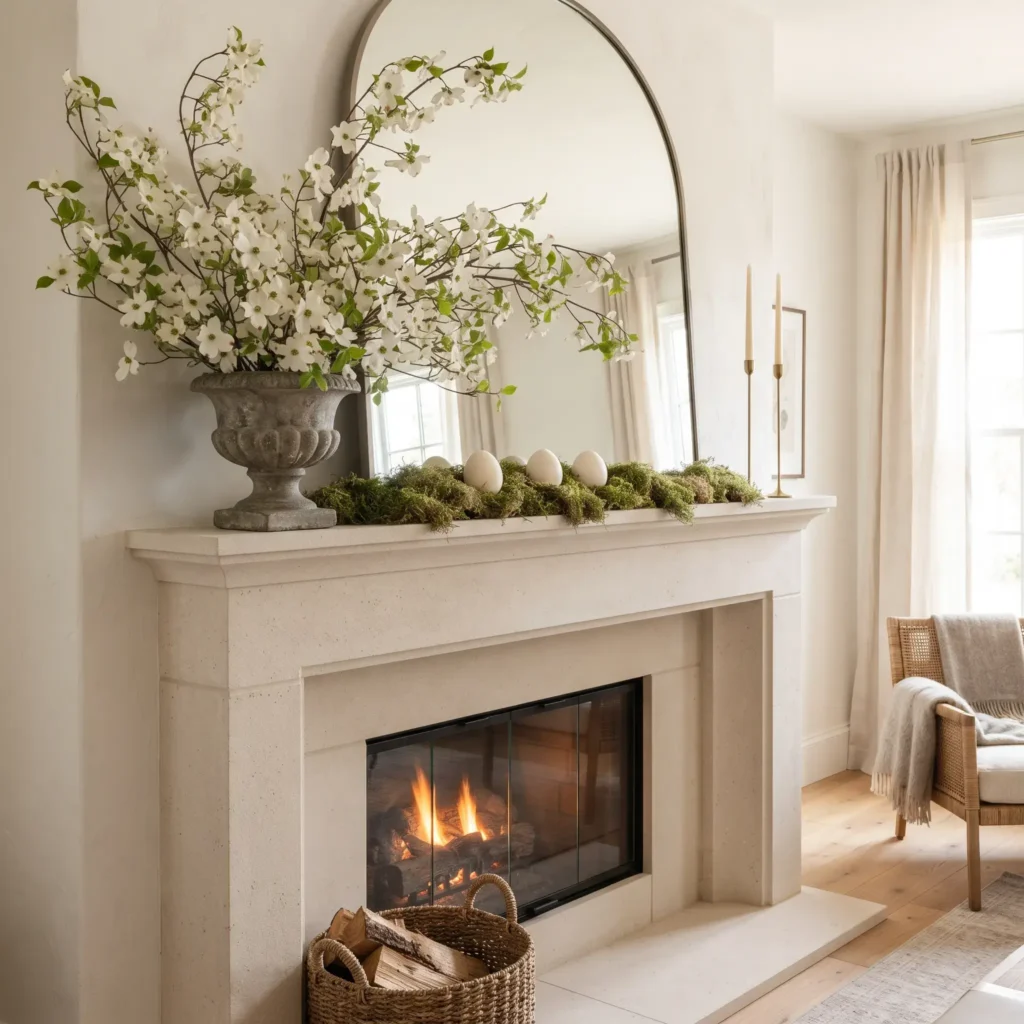
5. Asymmetrical Dogwood Hearth Mantel
Most holiday mantels look stiff because decorators place matching vases on both ends. This design shifts the floral weight to one side, using real dogwood branches anchored in a heavy stone urn to create natural movement across the room.
How to Style and Assemble It
- Place a heavy weathered stone urn or concrete planter on the left third of your fireplace mantel.
- Crumple an 18-inch square of galvanized chicken wire into a loose, layered mesh ball. Press this wire pillow down into the urn.
- Secure the wire across the rim using two crossed strips of waterproof floral tape, then fill the vessel with water.
- Cut fresh dogwood or forsythia branches three to four feet long. Slice a vertical two-inch slit up the bottom of each stem to help it drink.
- Push the branch ends through the wire mesh. Angle the longest stems so they sweep across the center of the mantel and climb toward the ceiling.
- Lay a narrow strip of dry sheet moss along the shelf to the right of the urn. Slip small cardboard shims underneath the moss to create gentle rolling mounds.
- Place three large, matte ivory blown goose eggs into the moss hollows.
- Set two tall, slender brass candlesticks on the far right end of the mantel shelf. This balances the heavy stone urn on the left while leaving plenty of open breathing room.
Products Used in This Design
- Weathered cast stone garden urn or concrete planter (8 to 10 inches tall)
- 2-inch galvanized hexagonal chicken wire
- 1/2-inch waterproof green floral tape
- 5 to 7 stems of fresh or forced white dogwood branches (Cornus florida)
- Preserved natural green sheet moss
- 3 blown, unpainted matte ivory goose eggs
- 2 slender unlacquered brass candleholders with white taper candles
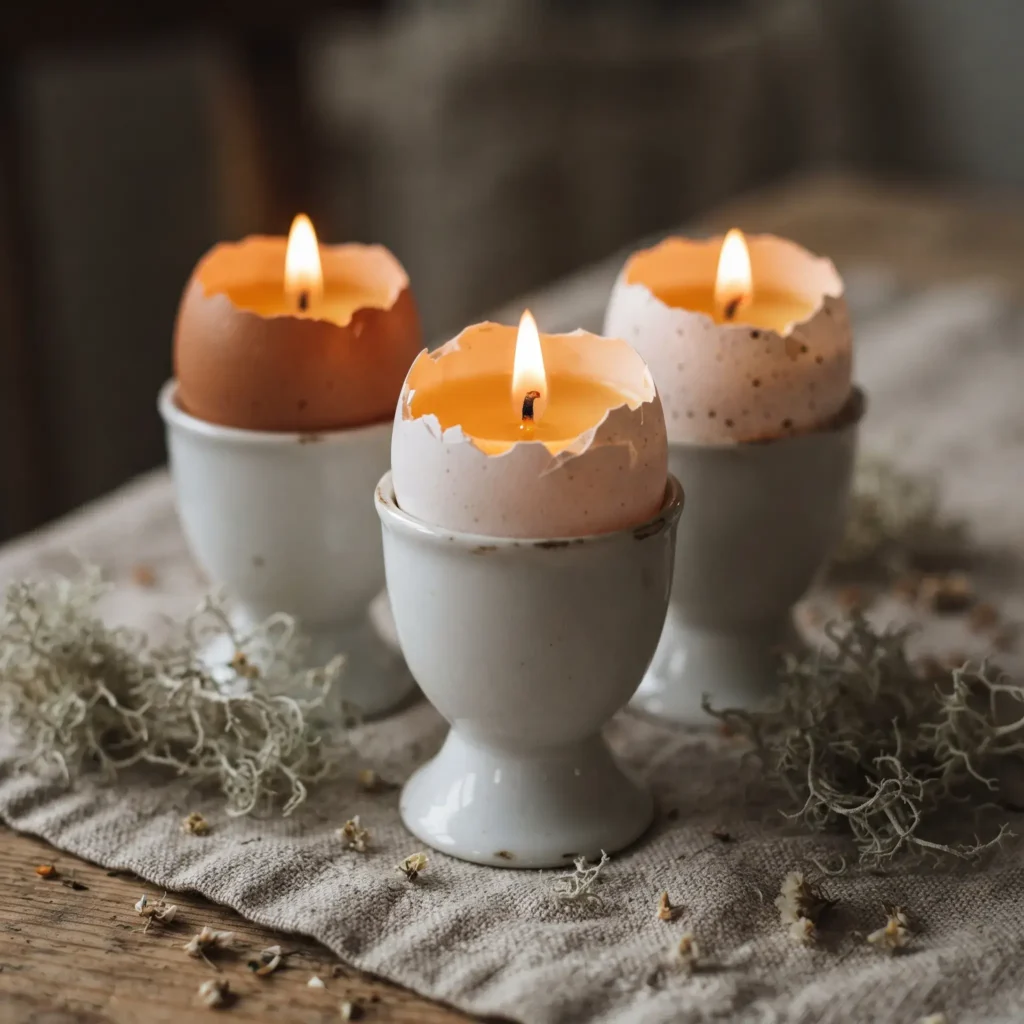
6. Hand-Poured Eggshell Beeswax Votives
Upcycled farm eggshells make beautiful, natural candleholders. Avian calcium is naturally translucent, allowing the warm golden light of burning beeswax to glow right through the shell walls.
How to Style and Assemble It
- Save large chicken eggshells, cracking them carefully near the top third.
- Wash the empty shells in warm soapy water. Gently peel away the soft inner skin membrane with your fingertips.
- Place the clean shells upright on a baking sheet lined with parchment paper. Bake at 200 degrees Fahrenheit (95 degrees Celsius) for twenty minutes. This dries and strengthens the shell walls while sanitizing them.
- Fix a small cotton wick tab to the inside bottom of each shell using a single drop of melted wax.
- Melt pure yellow beeswax pellets in a metal pouring pitcher over a double boiler until the wax reaches 155 to 165 degrees Fahrenheit (68 to 74 degrees Celsius).
- Pour the liquid wax into each eggshell, leaving a quarter-inch of space below the rim so the flame stays safe.
- Center the wick using a toothpick or wooden skewer while the wax cools at room temperature.
- Set the finished votives into porcelain egg cups at each dinner seat, or line five of them inside a wood tray filled with pale reindeer moss.
Products Used in This Design
- Cleaned jumbo brown and white farm eggshell halves
- 1 lb 100% pure cosmetic or candle-grade yellow beeswax pellets
- Size 2 pre-waxed cotton candle wicks with metal sustainer tabs
- Metal wax melting and pouring pitcher
- Candy or wax thermometer
- Vintage white porcelain egg cups or a small carved wood tray
- Preserved silver-gray reindeer moss (Cladonia rangiferina)
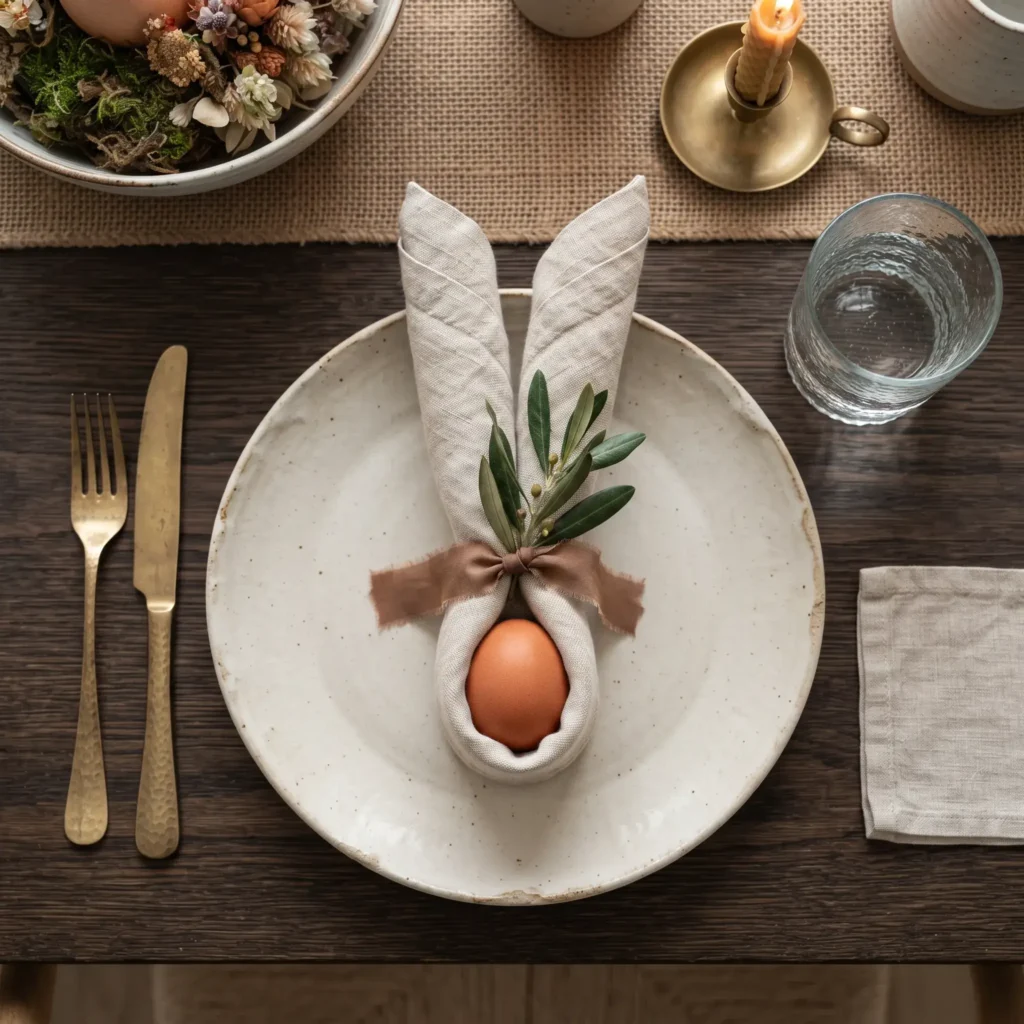
7. Tailored Flax Linen Bunny Place Settings
You do not need plastic figurines or cartoon cutouts to reference Easter themes on your dinner table. This simple linen fold gives a subtle nod to rabbit ears while keeping your table settings clean, textured, and grown-up.
How to Style and Assemble It
- Use a 20-inch square napkin made from washed, medium-weight flax linen in oatmeal, soft slate, or sage green.
- Lay the napkin flat in a diamond shape. Fold the bottom point up to the top point to create a triangle.
- Roll the fabric upward from the folded base toward the top point, creating a clean, tight cloth cylinder.
- Place a naturally dyed or speckled blown egg in the center of the roll.
- Bring the two fabric ends up around the egg, forming a snug horseshoe bend that cradles the shell.
- Tie a length of hand-torn velvet or silk ribbon tightly around the napkin ends just above the egg. Knot it cleanly in a square tie.
- Smooth the two standing linen ends flat so they stand upright like simple rabbit ears.
- Tuck a fresh sprig of olive leaves or dried baby’s breath behind the knot, and rest the wrap in the center of each dinner plate.
Products Used in This Design
- 20-inch square washed flax linen dinner napkins (oatmeal or pale olive)
- 1/4-inch hand-torn raw-edge silk or velvet ribbon in hazelnut or charcoal
- Naturally dyed or speckled blown eggs
- Fresh olive leaf clippings or dried white baby’s breath (Gypsophila)
- Matte ceramic or stoneware dinner plates
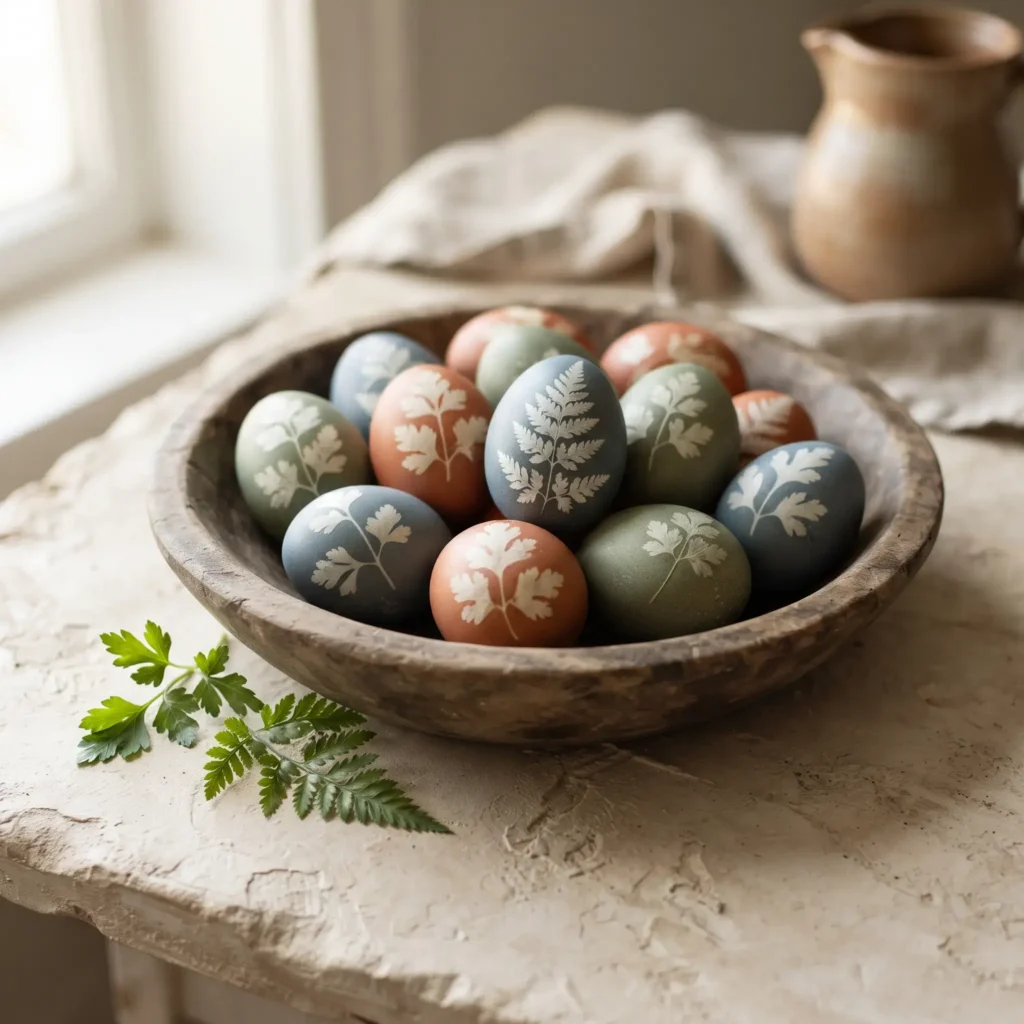
8. Botanical Leaf-Resist Dyed Eggs
Artificial store-bought dye tablets produce loud neon colors that look out of place in a styled home. Using household vegetable scraps creates soft earth tones that sink deep into the calcium of real eggshells. Wrapping the shell with fresh leaves creates clean white silhouettes without using stickers or paint.
How to Style and Assemble It
- Press a small, flat leaf with clear edges, like flat Italian parsley, maidenhair fern fronds, or wild clover, against the surface of a clean white egg.
- Cut a four-inch section of sheer nylon hosiery. Stretch the nylon tightly over the leaf and egg, pulling it snug so the leaf edges cannot shift.
- Tie the nylon closed at the back with kitchen twine.
- Prepare your botanical dye broth using the recipe table below. Add two tablespoons of white distilled vinegar per quart of liquid. The acid softens the calcium surface so the plant pigments can bond.
- Lower the wrapped eggs into the strained dye bath. Place the bowl in your refrigerator at 38 to 40 degrees Fahrenheit (3 to 4 degrees Celsius).
- Let the eggs steep for two to twelve hours depending on how deep you want the color. Chilling the liquid stops the vegetable mixture from fermenting during long soaks.
- Remove the eggs, cut away the nylon, and peel off the leaf to reveal a crisp white pattern against the dyed shell.
- Once dry, rub a single drop of olive oil over the shell with a soft cloth. This adds a soft satin luster and brings out the natural texture of the shell.
Products Used in This Design
- White farm chicken eggs or duck eggs
- Fresh flat-leaf Italian parsley, small fern fronds, or wild clover
- Sheer nylon stockings (cut into 4-inch bands)
- 100% cotton kitchen twine
- White distilled vinegar
- Yellow onion skins, red cabbage, ground turmeric, or red beets
- Cold-pressed olive oil and a soft cotton cloth
Botanical Dye Formulas and Color Chart
Different plant parts produce distinct natural pigments when boiled into a dye bath. Use this reference chart to mix your chosen colors:
| Target Color | Plant Material | Recipe and Preparation | Steep Time in Refrigerator | Color on White Shells | Color on Brown Shells |
|---|---|---|---|---|---|
| Terracotta Sienna | Dry Yellow Onion Skins (Allium cepa) | Simmer 4 cups papery skins in 4 cups water for 45 min. Strain; add 2 tbsp vinegar. | 2 to 4 hours | Warm terracotta clay | Deep rich mahogany |
| French Slate Blue | Red Cabbage (Brassica oleracea) | Simmer 1 small chopped head in 5 cups water for 35 min. Strain; add 2 tbsp vinegar. | 6 to 12 hours | Soft duck-egg blue | Muted sea-gray |
| Muted Botanical Olive | Turmeric + Cabbage Broth | Stir 3 tbsp ground turmeric into 2 cups warm strained cabbage broth with 2 tbsp vinegar. | 1 to 2 hours | Muted moss green | Deep olive bronze |
| Dusty Plum Rose | Red Beets (Beta vulgaris) | Simmer 3 large grated beets in 4 cups water for 30 min. Strain; add 2 tbsp vinegar. | 2 to 3 hours | Soft dusty blush | Rich plum wine |
| Aged Parchment | Black Pekoe Tea | Steep 6 dark tea bags in 3 cups boiling water for 30 min. Add 1 tbsp vinegar. | 1 to 3 hours | Warm antique bone | Rich deep tan |
How to Force Spring Branches Indoors
Forcing cut branches lets you enjoy early spring flowers weeks before they bloom outside. Follow these plant biology rules to get reliable blooms:
1. Wait for Winter Chilling Hours
Deciduous shrubs enter dormancy in late autumn. They must collect several hundred hours of outdoor temperatures below 45 degrees Fahrenheit (7 degrees Celsius) before their buds can wake up. Cut your stems in late January or February. Branches harvested before this cold window will dry out without opening.
2. Harvest on Mild Days
Cut branches when outside temperatures rise above freezing (32 degrees Fahrenheit or 0 degrees Celsius). This protects the delicate wood tissues from temperature shock. Choose branches with fat, rounded buds; thin, pointed buds produce only leaves.
3. Prepare the Stem Bases
Never smash woody stems with a hammer. Crushing splits the bark and promotes rot, which blocks the vessels that take up water. Instead, cut the stem base cleanly at a 45-degree angle using sharp bypass pruners. Use a sharp utility knife to slice a two-inch vertical cut up the center of the stem. This exposes fresh water-carrying channels without damaging the bark.
4. Hydrate in a Cool Room
Soak the whole branches horizontally in a tub of cool water for four hours to rehydrate the wood. Place them upright in clean vases filled with fresh water and three-quarters of a teaspoon of household bleach per gallon to keep bacteria low. Keep the vase in a cool room (60 to 65 degrees Fahrenheit) away from direct sunlight and heater vents, misting the bud tips every few days until the flowers open.
Unifying Your Home Decor Across Rooms
A styled home feels calm because design elements repeat from room to room. When you decorate every room with different colors and novelty items, your space feels busy. Carry a simple set of natural materials throughout your floor plan instead:
- Repeat Your Metal Finishes: If you display solid brass candleholders down the dining table, place matching brass candlesticks on the fireplace mantel. This shared metal ties both rooms together.
- Match Your Textiles: Use the same raw-edge oatmeal linen for your dining runner, your napkin wraps, and the ribbons hanging eggs on your entryway branches.
- Balance Your Pots and Vessels: Pair chalky, lime-washed terracotta pots on your front porch with matte stoneware bowls and pitchers on your kitchen counters.
- Echo Your Botanicals: Weave pussy willow stems into your front door wreath, then use those same willow wands alongside flowering quince branches on your entryway console.
Frequently Asked Questions
How do you make DIY Easter decor look expensive?
Focus on real, raw materials rather than synthetic craft supplies. Use unpressed flax linen, real eggshells, living green moss, and bare wood branches. Avoid bright plastic grass, neon dyes, and high-gloss spray paint. Stick to a tight color palette of bone, sage, terracotta, and soft brass.
What are the best branches to force for an Easter tree?
Flowering quince (Chaenomeles) and pussy willow (Salix caprea) work best. Quince branches offer sculptural, angular shapes with pale coral blooms that open in two to three weeks. Pussy willow stems show soft silver catkins in less than a week and dry in place without dropping their buds.
How do you keep living moss centerpieces fresh indoors?
Keep your moss away from direct heating vents and strong afternoon sun. Mist the surface once a day with clean water using a fine-spray atomizer. If your arrangement uses sprouted bulbs, place a clear silicone or plastic barrier underneath to protect your wood tabletops from moisture.
Can you reuse blown eggs year after year?
Yes. After blowing out the yolk and whites, rinse the inside of the shell with a mix of warm water and white distilled vinegar. Place the empty shells on a baking rack in an oven at 200 degrees Fahrenheit (95 degrees Celsius) for twenty minutes. This cures the inner protein lining, removes odors, and prevents the shells from turning brittle.
What can you do with living Easter bulbs once the flowers fade?
Do not throw them away. Snip off the dead flower head, but leave the green stem and leaves intact. Keep watering the pot near a sunny window so the leaves can feed the bulb. Once the leaves turn yellow and dry out in late spring, store the dry bulbs in a cool, dark closet. Plant them four to six inches deep in your garden beds in the autumn for outdoor blooms next spring.
Final Thoughts
Styling your home for spring does not require boxes of disposable plastic or complicated craft tools. By choosing living bulbs, real branches, and natural textiles, you create decorations that feel intentional and grounded.
Start small this weekend. Forage a few bare branches from your yard, pick up a pot of budding grape hyacinths from your local nursery, and let the natural shapes of early spring speak for themselves.