8 Simple to Extravagant Outdoor Christmas Decor Ideas That Feel Magical

Most outdoor holiday displays fail for three reasons: mismatched light colors, cluttered plastic figures, and cords that short out during the first winter storm. A display feels magical when it looks intentional. That requires consistent light temperatures, layered greenery, and clean installation methods that protect your home from damage.
This guide walks you through practical, step-by-step designs. We start with quick, low-cost porch accents and move up to estate-level illumination. Each concept includes exact styling rules, needed supplies, and the hardware required to keep your display lit all winter.
8 Outdoor Christmas Decor Ideas: From Simple Accents to Luxury Displays
Here are eight field-tested outdoor holiday decor ideas arranged from entry-level accents to full architectural installations.
1. The Nordic Birch and Lantern Porch
Difficulty: Beginner | Budget: $50 to $100 | Time: 1 hour
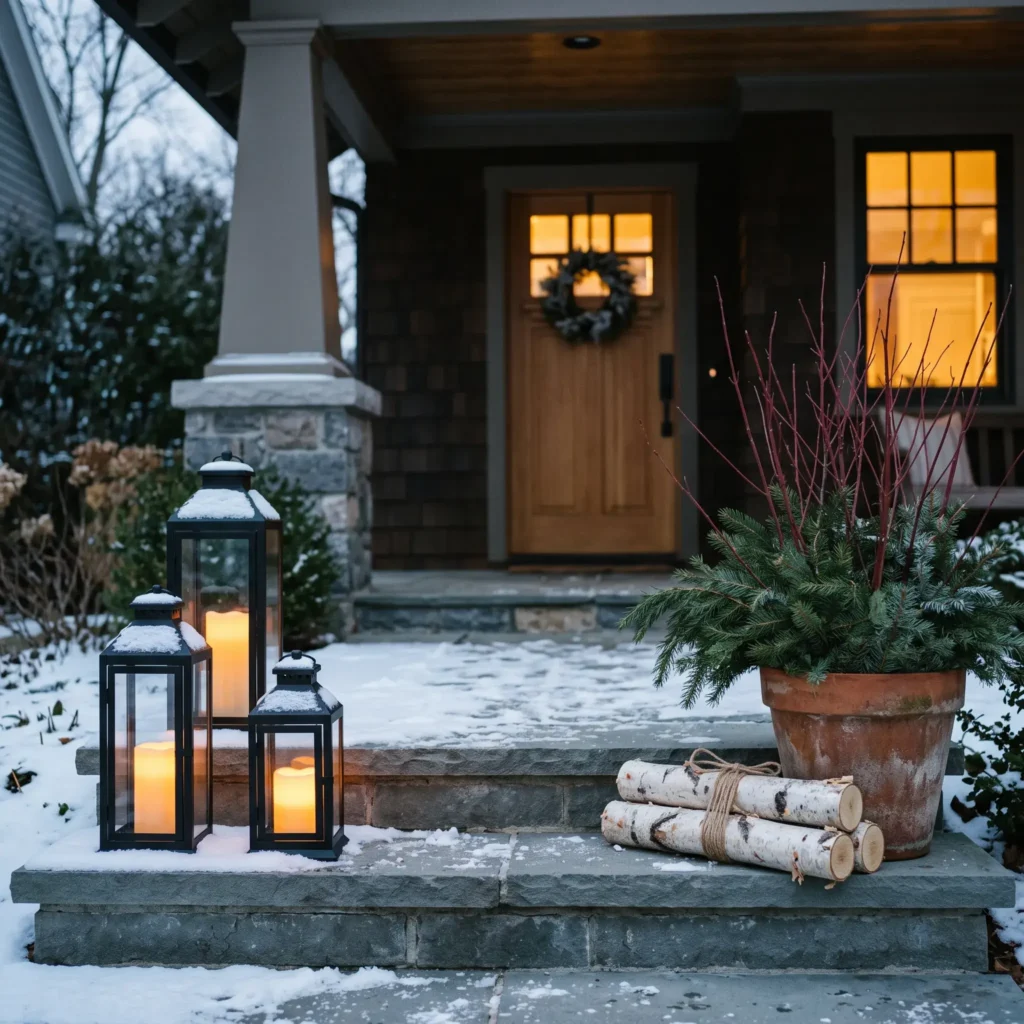
This setup relies on natural textures and soft ground-level lighting instead of plastic props. Group three black metal lanterns of varying heights (12, 18, and 24 inches) on the left side of your porch steps. Place battery-operated LED pillar candles inside each lantern, setting their automatic timers to turn on at dusk.
Balance the lanterns by leaning three white birch poles (four to five feet tall) against the opposite wall. Tie the poles loosely with coarse jute twine. Next, place an earthenware pot packed with fresh spruce cuttings and red twig dogwood branches at the base of the birch poles. This asymmetrical arrangement creates visual depth without blocking your doorway.
- Products Used:
- 3 powder-coated black iron and glass lanterns (12-inch, 18-inch, 24-inch)
- 3 outdoor battery-powered LED pillar candles with 6-hour timers (2700K warm white)
- 3 natural white birch logs (5 feet tall, 2 to 3-inch diameter)
- Heavy terracotta garden pot (14-inch diameter)
- Fresh spruce tips and red twig dogwood branches
- Natural jute twine
2. The Velvet-Suspended Mixed Conifer Door Wreath
Difficulty: Beginner | Budget: $60 to $120 | Time: 45 minutes
A single high-impact door accent often looks far more sophisticated than multiple small decorations. Choose a full 30-inch wreath made from real Fraser fir, Western red cedar, and seeded eucalyptus. The mix of broad needles, flat cedar scales, and eucalyptus leaves provides rich daytime texture.
Skip standard plastic over-the-door hangers that scratch weatherstripping. Secure a heavy-duty magnetic hook to a steel door, or use an exterior non-damaging adhesive anchor on painted wood. Suspend the wreath using a 3-inch-wide, outdoor-rated velvet ribbon in deep moss green or chocolate brown. Allow the ribbon tails to hang 18 inches below the wreath ring. Weave a strand of battery-operated micro-LED copper fairy lights (2700K) throughout the branches to produce a delicate evening sparkle.

- Products Used:
- 30-inch live mixed evergreen wreath (Fraser fir, red cedar, seeded eucalyptus)
- 3-inch wide waterproof outdoor velvet ribbon (moss green)
- Heavy-duty magnetic door hook (or outdoor adhesive utility hook rated for 10 lbs)
- Battery-operated copper wire micro-LED string lights (2700K, 50-bulb, waterproof pack)
Check out more Decor Styles
3. Scented Winter Planters with Brass Sleigh Bells
Difficulty: Beginner | Budget: $40 to $90 | Time: 1 hour
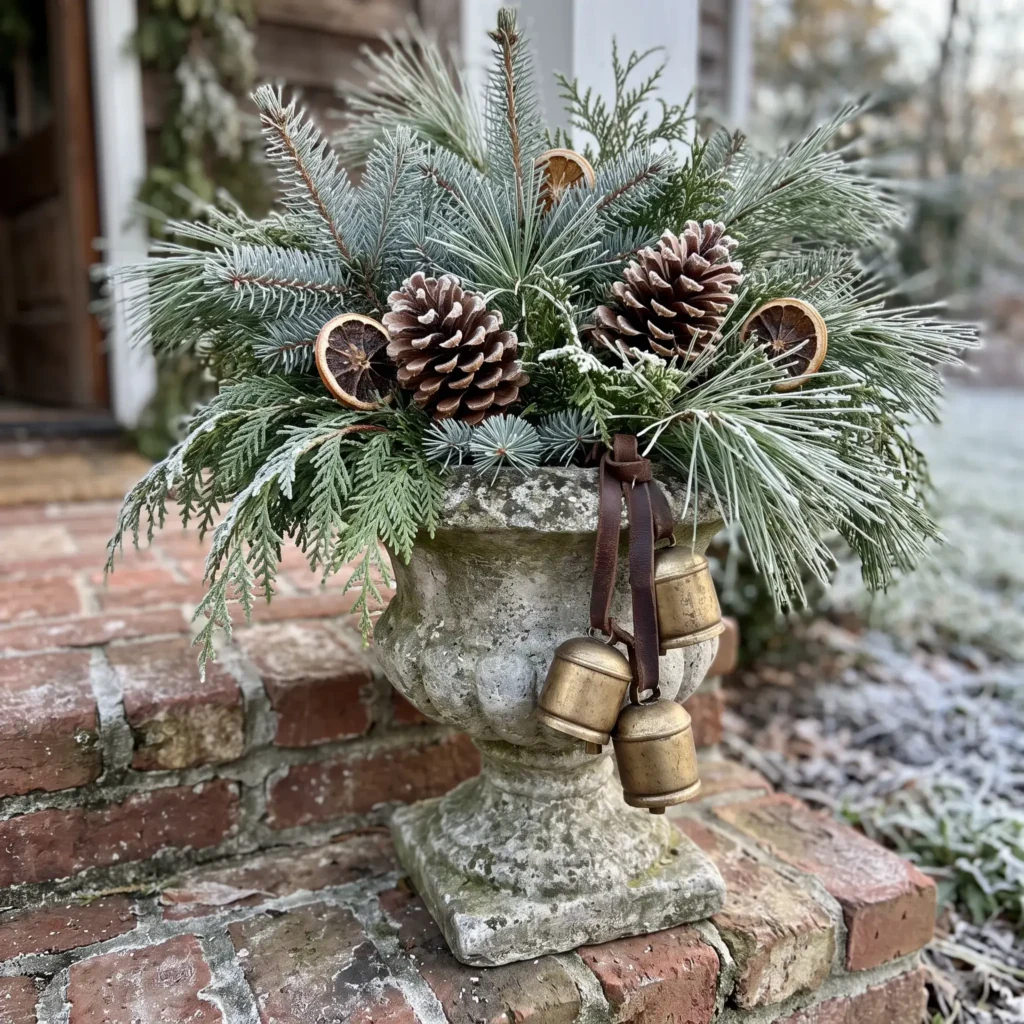
Instead of putting your summer planters in storage, turn them into durable winter urns. Pack an aged stone or concrete urn tightly with floral foam or compacted topsoil. Insert upright white pine and incense cedar boughs into the center to create height. Add blue spruce branches around the rim so they cascade naturally over the container edges.
Add large sugar pinecones and dehydrated orange slices on florists wire throughout the center. Tie three antique-finish brass sleigh bells to a strip of brown leather cord and drape them over the front edge of the planter. The metal bells catch exterior light and chime gently whenever the wind blows.
- Products Used:
- Cast-stone or fiber-clay entryway planter urn (16-inch to 20-inch rim)
- Fresh boughs of white pine, incense cedar, and Colorado blue spruce
- 3 large natural sugar pinecones (8 to 10 inches long)
- Dehydrated orange slices and florists paddle wire (22-gauge)
- 3 vintage-style stamped brass sleigh bells strung on thick leather cord
4. The Layered Cedar and Magnolia Entry Arch
Difficulty: Intermediate | Budget: $250 to $500 | Time: 3 to 4 hours
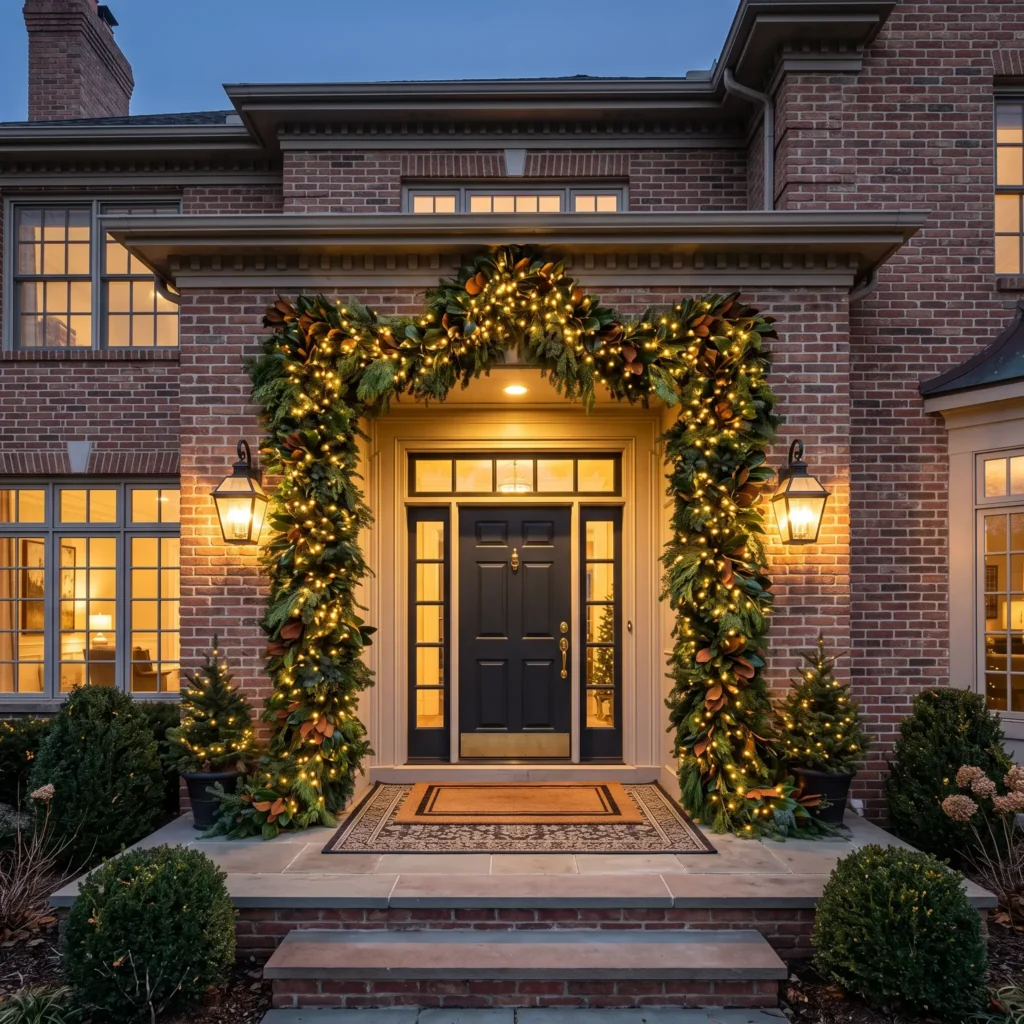
A flat, single-strand store garland looks thin around substantial door trim. To build a full, professional arch, combine three separate materials. Start with an artificial nine-foot pine garland as your sturdy base. Wire real-touch Norfolk pine or Western red cedar garlands directly onto this foundation using green floral wire. Next, tuck fresh Southern magnolia branches into the body, angling them outward so their glossy green tops and velvety brown undersides show clearly.
Mount the garland around your door frame using non-damaging siding hooks or spring-steel brick clips. Never drive screws directly into mortar or brick faces. Weave two strings of 5mm wide-angle conical warm white LED lights through the garland. Place 100 lights for every three feet of greenery. The wide lenses on 5mm diodes disperse light in a full 360-degree circle, creating an even, balanced frame around your entrance.
- Products Used:
- 2 strands of 9-foot heavy artificial pine garland (foundation layer)
- 4 strands of 6-foot real-touch cedar or Norfolk pine garland
- 1 bunch of fresh Southern magnolia branches
- 6 strings of commercial 5mm wide-angle conical LED lights (2700K warm white)
- Spring-steel brick clips or vinyl siding hooks
- 22-gauge green floral wire and black UV-stabilized cable ties
5. Symmetrical Flanked Topiaries with Micro-Dot Lighting
Difficulty: Intermediate | Budget: $200 to $450 | Time: 2 hours
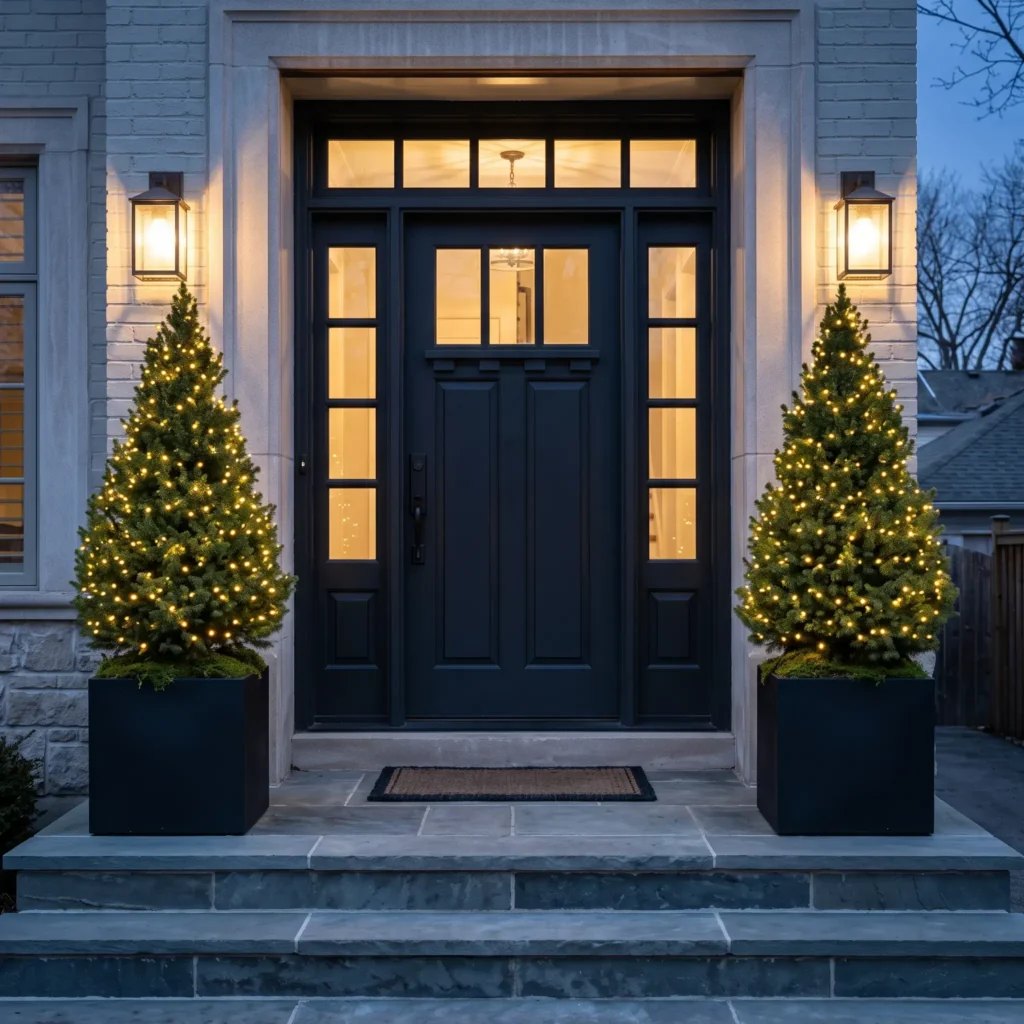
Symmetry brings immediate visual balance to an entryway. Place matching heavy square planters on both sides of your front door. Plant a 4-foot dwarf Alberta spruce or structured spiral cedar topiary in each container. Top the soil with natural sheet moss to conceal the root balls and keep dirt from splashing during heavy rain.
Wrap each tree tightly using commercial micro-dot string lights with dark green wire. Start at the top of the central trunk and work downward in tight, three-inch spirals. Tuck the wire into the inner branches so the bulbs appear to float directly within the needles. Connect both trees to a single exterior smart plug set to an automatic sunset schedule.
- Products Used:
- 2 matched dwarf Alberta spruce trees (4 feet tall)
- 2 heavy composite square planters (dark slate or matte black finish)
- 2 spools of commercial green-wire micro-dot LED lights (2800K, 300 lights each)
- Natural preserved sheet moss
- 1 outdoor dual-outlet Wi-Fi smart timer plug
6. The Precision-Staked C9 Walkway Border
Difficulty: Intermediate | Budget: $150 to $300 | Time: 2 to 3 hours
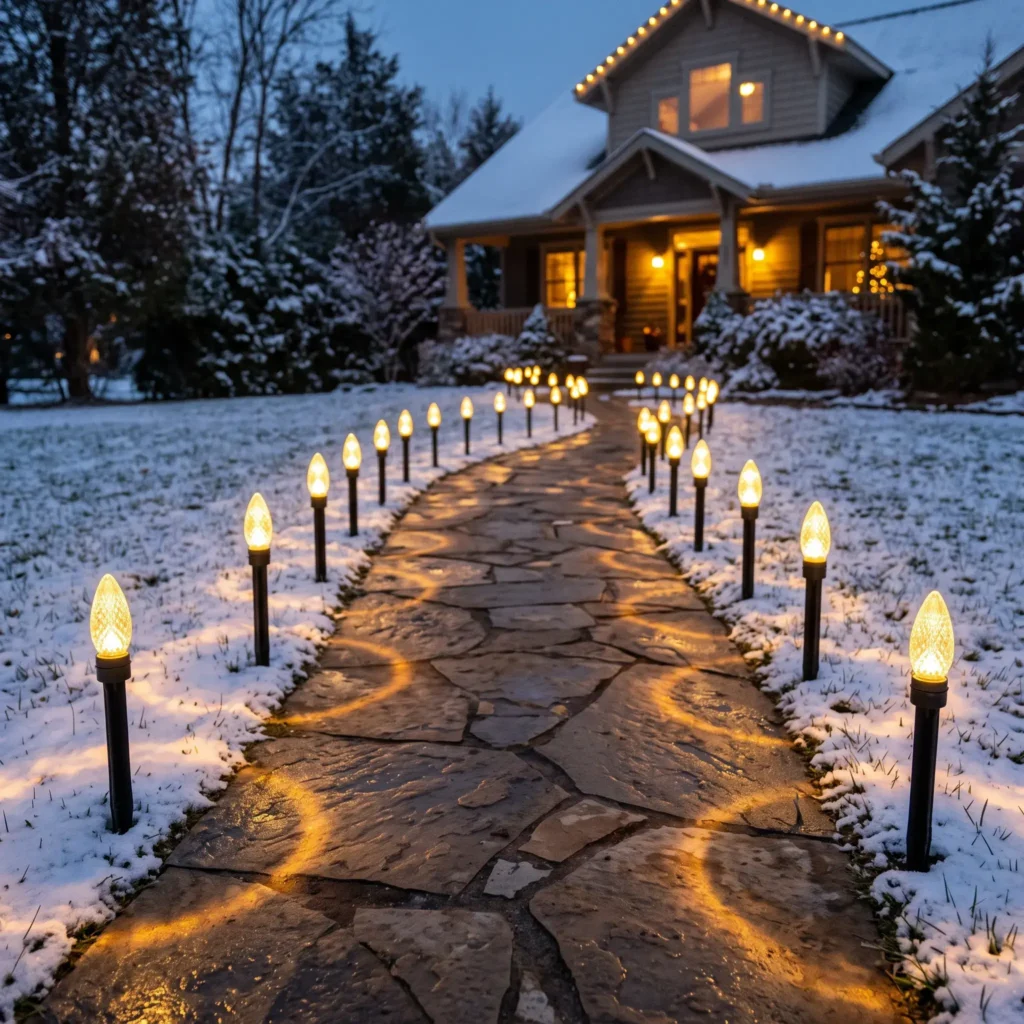
Unsecured light strings draped along lawn edges look sloppy and quickly get buried by snowdrifts. A crisp border along your front walk guides guests safely toward your door while framing your yard cleanly.
Use 12-inch rigid plastic ground stakes spaced exactly 12 inches apart along both edges of your walkway. Mount commercial C9 faceted LED bulbs into the stakes, making sure every bulb points straight up at a 90-degree angle. Elevating the sockets 12 inches keeps them above melting slush, snowbanks, and surface puddles. This prevents water from entering the connections and tripping your ground-fault circuit interrupter (GFCI) outlets.
- Products Used:
- 100-foot commercial C9 socket cord line (12-inch socket spacing, 18 AWG SPT-2 wire)
- C9 faceted warm white (2700K) LED retrofit bulbs
- 100 rigid 12-inch heavy-duty impact ground stakes
- Exterior 16/3 SJTW heavy-duty extension cord
7. Architectural Trunk and Scaffold Branch Wrapping
Difficulty: Extravagant | Budget: $600 to $1,500 | Time: 1 to 2 days
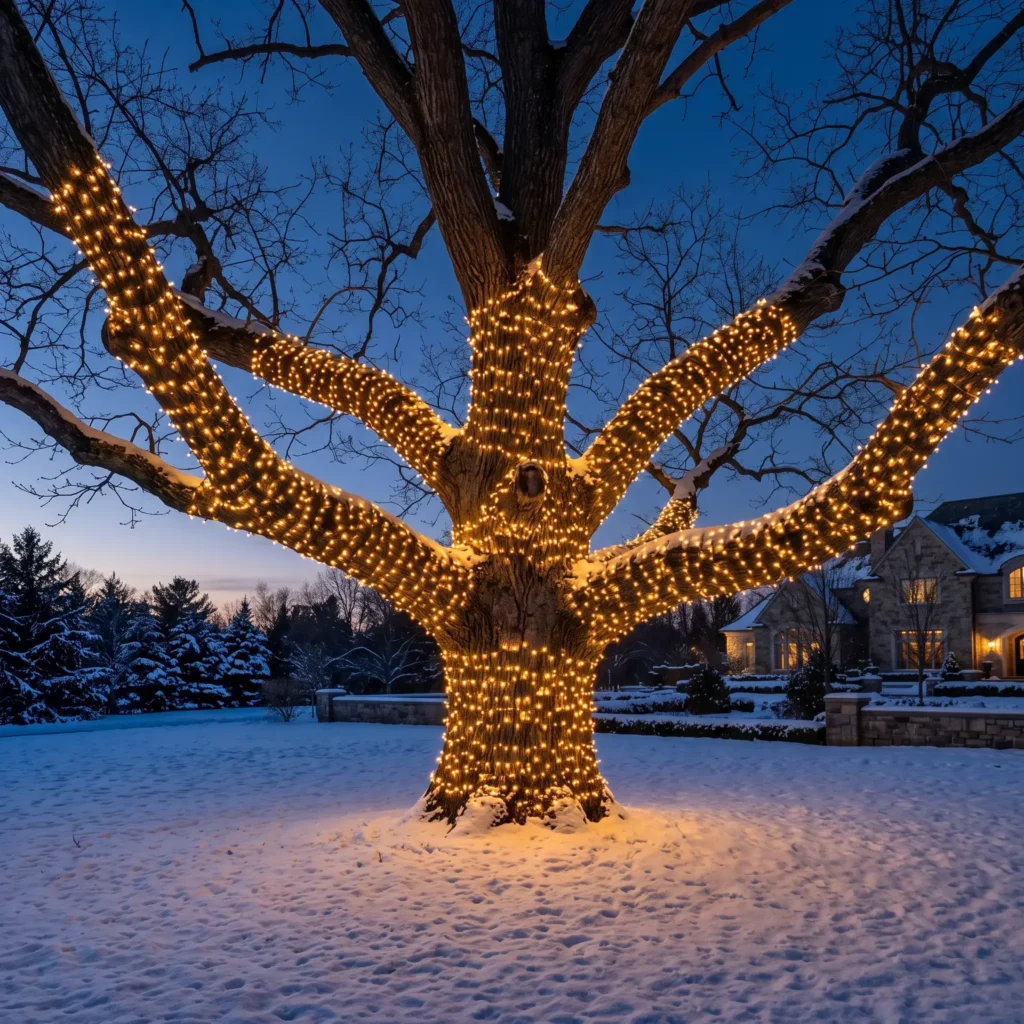
Throwing light strands loosely over outdoor bushes creates messy, uneven blobs of light. Commercial decorators sculpt mature deciduous trees by wrapping the trunk and primary limbs tightly after the leaves have dropped.
Select four to six main scaffold branches that grow out from the tree’s main fork. Wrap 5mm wide-angle conical warm white LED strings tightly around the trunk, keeping four inches of vertical space between each spiral. Continue wrapping outward along each primary limb for three to five feet before reversing back down toward the trunk. Keep the wire taut enough to prevent wind slippage, but leave enough slack to slide a finger under the wire so you protect the bark. This method highlights the natural branch structure of the tree against the dark sky.
- Products Used:
- Commercial 5mm wide-angle conical LED light strings (2700K, coaxial watertight connectors)
- Heavy-duty zip ties (black, UV-stabilized)
- Heavy-duty fiberglass extension ladder
- 14/3 outdoor SJTW extension cords
- Watertight gasketed junction boxes for ground connections
8. Custom-Cut Commercial C9 Roofline with Gable Peaks
Difficulty: Extravagant | Budget: $800 to $2,500 | Time: 2 to 3 days
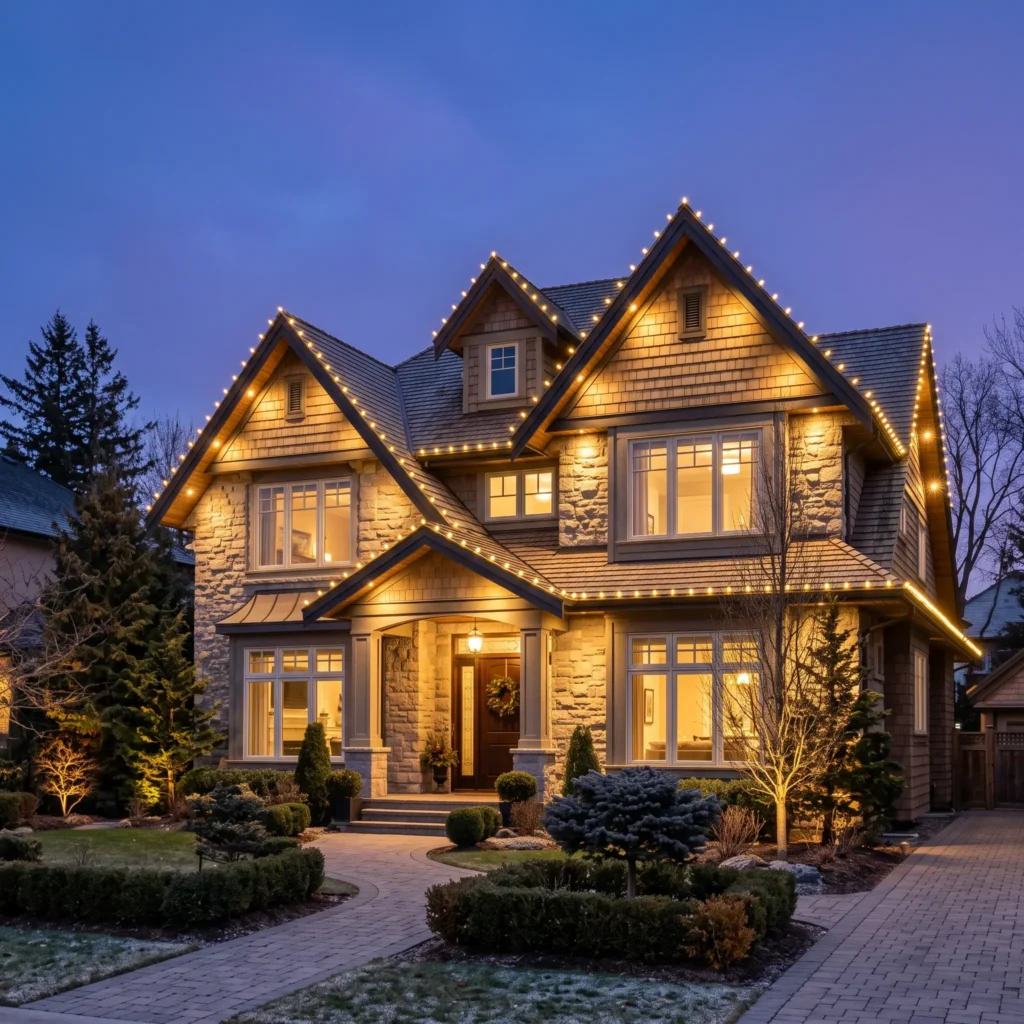
Retail light strings bought off the shelf often sag, feature inconsistent bulb spacing, and leave dangling power lines across roof valleys. Luxury estate rooflines use custom-measured bulk cords fitted with slide-on plugs to create clean, sharp lines along every roof edge.
Measure your eaves, gables, and fascia boards. Cut 18 AWG SPT-2 commercial bulk wire to the exact length of each roof section using wire cutters. Attach C9 commercial sockets and slide-on male and female vampire plugs to each run. Clip every socket securely into place using heavy-duty all-in-one roof clips that clamp onto gutters or slip under shingles. Splicing unlit SPT-2 wire across roof valleys and dormers keeps power runs hidden, ensuring only the true architectural lines of your home glow after dark.
- Products Used:
- 500-foot spool of 18 AWG SPT-2 commercial bulk socket wire (12-inch spacing)
- C9 warm white (2700K) smooth ceramic or faceted LED bulbs
- Slide-on male and female vampire plugs (SPT-2 rated)
- Heavy-duty roof clips (Omni Clips or Tuff Clips)
- Heavy-duty wire cutters and wire strippers
- Fall protection harness and roof anchor kit
The Science of Cohesive Lighting: Color Temperature and Visual Balance
A great display feels balanced because it follows basic optical rules. Random assortments of decorations often look disjointed. Building an attractive setup comes down to color temperature and vertical balance.
Why You Must Match Kelvin Ratings
The visual warmth of outdoor lighting depends on the Kelvin (K) temperature scale. The human eye reads light against dark night skies with high sensitivity. Mixing different light temperatures along a single sightline breaks visual harmony and makes an installation look uncoordinated.
- 2200K to 3000K (Warm White): Radiates soft golden and amber tones similar to candlelight and traditional incandescent filaments. It flatters green pine boughs, softens stone masonry, and creates an inviting entry.
- 4000K to 4600K (Neutral White): Provides a clean, modern white without yellow or blue undertones. It accentuates crisp contemporary architecture and painted trim.
- 5000K to 6500K (Cool White): Casts an icy, blue-tinted light. When mixed with warm lighting, it looks harsh. However, when used alone with silver, flocked trees, or icy winter themes, it creates a striking frost effect.
Select one color range and stick to it across your entire property.
| Design Theme | Dominant Kelvin Range | Palette | Primary Materials | Where to Apply |
|---|---|---|---|---|
| Nostalgic Heritage | 2500K to 2800K (Warm Amber) | Crimson, forest green, warm gold | Cedar swags, velvet ribbon, brass bells | Front porches, covered entries, symmetrical doors |
| Nordic Minimalist | 2700K to 3000K (Warm White) | Matte black, slate gray, spruce green | Birch logs, raw iron, unadorned pine boughs | Stone steps, modern entryways, small porches |
| Architectural Line | 4000K to 4600K (Neutral White) | Clean white, graphite, dark slate | Faceted C9 retrofits, commercial clips | Rooflines, window friezes, perimeter fence lines |
| Frosted Wonderland | 5000K to 6500K (Cool Blue-White) | Ice blue, silver, frosted white | Flocked greenery, acrylic crystal drops | Deciduous tree canopies, modern winter landscapes |
The Three Vertical Sightlines
To give your display depth rather than clustering items near the front door, arrange decorations across three vertical zones:
- The Ground Plane: Pathway stake lights, porch lanterns, and filled urn planters.
- The Eye-Level Plane: Door wreaths, vertical window swags, and garland-wrapped porch posts.
- The Skyline Plane: Custom roofline C9 bulbs and illuminated tree branches.
Layering your design across all three zones draws the eye smoothly up and down the property.
How to Hang Greenery Without Damaging Your Home
Driving screws or nails into exterior brick, mortar, or siding creates holes that let in winter moisture. When water freezes inside masonry joints, it expands and cracks the surface. Use these non-destructive mounting tools instead:
- Spring-Steel Brick Clips: These tempered steel clips snap directly onto protruding exterior brick edges using spring tension. They hold up to 25 pounds without tools, glue, or drilling.
- Exterior Tension Rods: For deep window alcoves or covered doorways, wedge a heavy-duty, spring-loaded utility tension rod into the recess. Secure thick garlands directly to the rod using zip ties.
- Vinyl and Aluminum Siding Hooks: These curved stainless steel hooks slide into the horizontal seam between overlapping siding panels. They hold firm under high winter winds and slip out without leaving marks.
- Magnetic Hooks: Use rubber-coated neodymium magnetic hooks on steel security doors. They hold heavy wreaths without scratching the paint or pinching door weatherstripping.
Electrical Calculations and Safety: Preventing Dark Displays
Outdoor holiday displays often go dark because of overloaded circuits or moisture leaking into plugs. Calculating your electrical load and keeping connections dry ensures your lights run safely all season.
How to Calculate String Lights for Trees
Guessing the length of lights needed for a tree leads to under-wrapped trunks or extra tangled cords. Calculate the required length using the spiral winding formula:
Length of Lights Needed = (Trunk Height in Inches / Spiral Spacing in Inches) x Trunk Circumference in Feet
For spiral spacing, four inches works best.
Real-World Example: Take a mature oak trunk with a 36-inch circumference (3.0 feet). You want to wrap it up to the first major limb union at 8 feet tall (96 inches) with 4-inch spiral spacing:
- 96 inches divided by 4 inches = 24 total spiral revolutions.
- 24 revolutions multiplied by 3.0 feet = 72 feet of light string.
You need 72 feet of lights for the trunk alone before wrapping any scaffold branches.
The 80% Safe Circuit Load Rule
Never max out a household circuit breaker. The National Electrical Code (NEC) states that continuous electrical loads running for three or more consecutive hours must not exceed 80% of a circuit’s total capacity.
Safe Continuous Capacity = Line Voltage (120V) x Breaker Amps x 0.80
- Standard 15-Amp Circuit: 120V x 15A x 0.80 = 1,440 Watts maximum safe continuous load.
- Heavy-Duty 20-Amp Circuit: 120V x 20A x 0.80 = 1,920 Watts maximum safe continuous load.
Old incandescent C9 bulbs draw roughly 7 Watts each. Running 200 incandescent bulbs pulls 1,400 Watts, which almost maxes out an entire 15-amp circuit. Commercial LED C9 bulbs draw only 0.6 Watts each. That same 200-bulb run in LED consumes only 120 Watts, freeing up power for the rest of your home.
Stopping GFCI Nuisance Trips in Rain and Snow
Ground-fault circuit interrupter (GFCI) outlets protect homes by cutting power when current leaks to ground. They trip when they detect a current difference as small as 4 to 6 milliamperes. In wet weather, water bridging an exposed plug creates a tiny leakage path that instantly trips the outlet.
Follow these installation rules to prevent nuisance trips:
- Apply Dielectric Grease: Squeeze non-conductive silicone dielectric grease into female plug terminals before inserting male plugs. The grease seals out moisture and stops corrosion without disrupting the electrical connection.
- Form Downward Drip Loops: Always curve your power cord downward below the plug connection before leading up into a socket. Water running down the wire drips off the bottom curve instead of flowing into the electrical housing.
- Elevate Connections Off the Ground: Never leave extension cord connections resting on grass, mulch, or driveways where rain pools. Lift connections several inches using plastic stakes, or mount them inside sealed outdoor connection boxes.
- Avoid Plastic Grocery Bags and Electrical Tape: Wrapping plugs in grocery bags or standard electrical tape traps humidity and condensation. Because trapped moisture cannot escape, it corrodes copper prongs and repeatedly trips GFCI outlets. Leave connections elevated so air circulates freely, or protect them inside dedicated weatherproof boxes.
- Use In-Use Weatherproof Covers: Replace flat exterior outlet plates with deep, clear bubble covers. These protect plugged-in cords from wind-driven rain and heavy snow.
| Problem | Cause | Solution | Result |
|---|---|---|---|
| Plugs short in rain | Water bridges live prongs | Apply dielectric grease; elevate cords | Stops wet-weather GFCI trips |
| Shingle wire abrasion | Wind rubs wires on roof grit | Use thick SPT-2 wire and rigid clips | Prevents bare-wire short circuits |
| Breakers click off | Display draws over 80% load | Switch to 5mm or C9 LED retrofits | Keeps power draw within safe limits |
| Outlets short in snow | Snow drifts enter outlet box | Install deep, in-use bubble covers | Keeps connections completely dry |
| Timers desynchronize | Power dips reset manual timers | Use outdoor Wi-Fi smart plugs | Maintains schedules automatically |
Commercial Wiring: Using Bulk SPT-2 Wire and Vampire Plugs
To build clean, custom rooflines without cord slack, professional decorators use bulk zip cords and slide-on vampire plugs.
Choose SPT-2 Over SPT-1 Cord
Both cord types use 18-gauge copper wire rated for 10 amps. However, SPT-2 wire has a thicker insulation jacket (0.045 inches compared to 0.030 inches on SPT-1). This thicker jacket resists sharp shingle abrasion, UV exposure, and freezing winter temperatures far better than lighter wire.
How to Wire Slide-On Vampire Plugs Safely
- Cut your 18 AWG SPT-2 wire flush at a clean 90-degree angle using sharp wire cutters. Do not strip the plastic insulation off the ends.
- Separate the two conductors roughly one-quarter of an inch down the middle.
- Identify the polarity:
- The smooth wire carries the hot line. Connect it to the narrow brass blade of the vampire plug.
- The ribbed wire serves as the electrical neutral. Connect it to the wide blade of the vampire plug.
- Press the wire firmly into the channel on the back of the plug.
- Slide the back cover into place. The internal metal teeth pierce through the wire insulation to complete the circuit.
- Add an inline female vampire plug anywhere along the run to drop power down to a lower gutter or dormer without running extra extension cords.
Frequently Asked Questions
Which Christmas lights look better outside: warm white or cool white?
Warm white (2700K to 3000K) looks best on traditional homes, brick masonry, and organic greenery because it replicates the soft amber glow of incandescent bulbs. Cool white (5000K to 6500K) works best on modern architecture, contemporary stone, and cool blue or silver displays. Avoid mixing both color temperatures on the same property.
How do professional decorators get roofline lights completely straight?
Professionals use custom-cut 18 AWG SPT-2 commercial bulk wire and heavy-duty socket clips like Omni Clips or Tuff Clips. These clips clamp firmly to gutter rims or slide beneath roof shingles, holding each C9 bulb upright at an exact 90-degree angle without cord sag.
How do I stop outdoor Christmas lights from tripping the GFCI outlet when it rains?
Elevate all cord connections off wet soil and mulch using stakes. Add silicone dielectric grease into plug sockets to displace water, and form downward drip loops on all cords before they enter an outlet. Avoid wrapping plugs in plastic bags, which trap condensation.
How many feet of lights do I need to wrap a tree trunk?
Divide the trunk height in inches by your desired spacing between spirals (four inches is standard), then multiply that number by the tree circumference in feet. An 8-foot trunk (96 inches) with a 3-foot circumference wrapped at 4-inch spacing requires 72 linear feet of lights.
Can I leave outdoor holiday lights plugged in during heavy snow?
Yes, provided your lights are outdoor-rated (look for an IP65 rating), connected to a working GFCI outlet, and plugged into a deep, in-use weatherproof bubble cover. Sockets should remain elevated so melting snow drains away without submerging electrical connections.
What is the safest way to store commercial light cords after the season?
Unscrew all C9 LED bulbs from their sockets and store them in partitioned ornament containers to prevent scuffing. Wrap the bulk SPT-2 cord lines around plastic cord reels or through heavy plastic utility tubs. Label each run with masking tape detailing the specific roofline or eave section where it belongs.
A memorable outdoor holiday display comes down to planning rather than buying more plastic decorations. Pick a single color temperature, invest in durable greenery, and secure your rooflines with commercial clips. When your lighting adheres to clear visual sightlines and safe electrical loads, your home stays welcoming, bright, and trouble-free through every winter storm.